5.1 A Word About Man Pages
5.2 Tailoring the Startup Environment
5.2.1 Setting Up CodeBuilder to Boot
Automatically
5.2.2 Manual Startup
5.3 Tailoring CodeBuilder Windows
5.4 Tailoring Your UNIX Environment
5.5 Quitting CodeBuilder
5.6 Login Accounts
5.6.1 The Concept of a Home Directory
and a User Environment
5.6.2 The UNIX Shell
5.6.3 Superuser and Privileges
5.6.4 A Word About Security
5.6.5 The Root Password
5.6.6 Setting Up User Accounts
5.6.7 The Password File
5.6.8 The Group File
5.6.9 Administrative Login Accounts
5.6.10 Disabling User Logins
5.6.11 Removing Users
5.6.12 Changing the Message-of-the-Day
5.6.13 Special Characters
5.7 Managing Your UNIX Environment
5.7.1 What's Running?
5.7.2 Killing a Program
5.7.3 Background Program Execution
5.7.4 Shell Files
 5.0 CodeBuilder Administration
CodeBuilder requires considerably less "administration" than
traditional UNIX systems. Since the underlying operating system is the Macintosh
Operating System (MacOS), running CodeBuilder is, in general, no more complex
than running a MacOS application. CodeBuilder, however, is a multiuser system
with the concept of logins, passwords, and file permissions.
5.1 A Word About Man Pages
CodeBuilder supports a vast array of UNIX commands and utilities. All of
the UNIX commands are documented in a set of "man" pages included
with CodeBuilder. The UNIX "man" pages are divided into numbered
sections. Commands in this manual and all other CodeBuilder documents are
referenced using these section numbers (e.g. gawk(1)).
The man page sections are:
Section No.
| Section Title
|
1
| User Commands
|
2
| System Calls
|
3
| Library Functions
|
4
| Special Files
|
5
| File Formats
|
6
| Games
|
7
| Public Files, Tables & Troff Macros
|
8
| Maintenance Commands
|
9
| X Window System Commands
|
5.2 Tailoring the Startup Environment
Whenever /etc/rc sees changes in the CodeBuilder Control Panel,
it invokes the shell script /etc/rc.config to update several system
files, including /etc/rc.conf, to the new parameter values. /etc/rc
then reads the variables defined in /etc/rc.conf and initializes
the services and daemons specified.
Most variable definitions in rc.conf(5) reflect the configuration
settings entered in the CodeBuilder Control Panel. When you modify the Control
Panel, the changes are applied to rc.conf the next time CodeBuilder
boots. For definitions not covered by the Control Panel, edit rc.conf
and modify the variable directly. All rc.conf definitions are described
below.
The first variable definition controls the configuration of the hostname
your system:
HOSTNAME
| The name of the machine running CodeBuilder.
|
The following boolean variables determine whether or not an optional
service is invoked, or is started by rc. A null value (or string)
is interpreted as negative; any other value is interpreted as affirmative,
for example, the entry:
START_cron="yes"
will start the cron daemon during the boot process, whereas the
entry:
START_cron=
will not start cron. Unused variables can be also be disabled (made
negative) by preceding the entry with a pound ('#') sign.
CLEANUP_tmp
| Remove files from /tmp (aka /var/tmp) at startup.
|
PRESERVE_EDITOR_FILES
| Preserve ex and vi edits in progress in the event
of a system crash.
|
START_cron
| Execute commands by date/time via cron(8).
|
START_lpd
| Manage spooled printer output via lpd(8).
|
START_macmntd
| Automatically mount inserted removable media (e.g. floppies, CDs, etc.)
via macmntd(8).
|
START_syslogd
| Log system messages via syslogd(8). By default, this variable
is set if the START_lpd definition is affirmative.
|
When editing /etc/rc.conf, be careful not to remove any variables
which the script /etc/rc.config expects to find.
As a final step in the startup process, /etc/rc executes commands
in a user-supplied file named /etc/rc.local, if it exists. The
/etc/rc.local file is typically used to start up any machine specific
processes after CodeBuilder has booted. Online examples of these files can
be found in the /usr/share/skel directory.
5.2.1 Setting Up CodeBuilder to Boot Automatically
CodeBuilder can be set up so that it boots automatically when you start
your machine. Place an alias of the CodeBuilder application file
in the System Folder: Startup Items folder. Later, if you want
to reset your Macintosh not to boot CodeBuilder automatically, simply remove
the alias files from the Startup Items folder.
5.2.2 Manual Startup
If CodeBuilder has not been configured to start automatically, simply double-click
the CodeBuilder application in the CodeBuilder v1.0 folder
from your Finder desktop.
5.3 Tailoring CodeBuilder Windows
CodeBuilder windows are started up by the wind(8) daemon which
is found in the /usr/bin directory. Note how /usr/bin/wind
is invoked by the .login file when you log on to the CodeBuilder
console. When /usr/bin/wind is initiated, the system looks in your
home directory for a file named .windrc, which specifies your preferred
window environment. If there is no .windrc file in your home directory,
a single 24-row by 80-column window is opened with a default font and font
size (Monaco 9 or the closest available fixed-width font).
If you want to design your own window environment, create a .windrc
file in your home directory. The easiest way to create a .windrc
file is to create all the windows you want for your standard startup environment,
position them as desired, and set the active window's font type and point
size to the font and size you prefer. Then select Save Window Environment
in the File menu. You will be asked to provide a file name. The first time
you do this, you must name the file .windrc file and place it in
your home directory. The changes will take effect the next time you launch
CodeBuilder. It is a good idea to keep a copy of your current .windrc
each time you change your window environment so that you can easily return
to the previous environment. If you want to return to the system default,
simply remove the .windrc file you created.
To change the name of a terminal window, edit the .windrc file
and change the name from "Terminal n" to whatever you would like.
If you want a terminal window to run an alternative program instead of the
shell specified in your /etc/passwd entry, simply follow the window
name with a -command, where command is any legal program
name (you must use the complete pathname) and any parameters. When that
terminal window opens it will run the command specified. Note that the terminal
window will close automatically when that command terminates. Useful commands
to use here are interactive programs such as /usr/bin/vi <filename>.
See the wind(1) man page for details on tailoring your .windrc
environment.
5.4 Tailoring Your UNIX Environment
The user's environment includes the TERM, TERMCAP and TTY environment variables
set by the wind daemon. It is important that these remain set to proper
values, otherwise, undesirable functioning of the VT100 emulation within
your terminal windows may result. Under CodeBuilder, login(1) creates
a special variable - MACHTEN, indicating the CodeBuilder kernel version
number.
To see your current environment, type:
printenv
A typical environment looks like this:
VIRTUAL_MEMORY=false
POSIX=true
HOME=/home/root
SHELL=/bin/csh
LOGNAME=root
USER=root
PATH=/usr/bin:/bin:/usr/sbin:/sbin:/usr/X11/bin:/usr/libexec
MACHTEN=4
PWD=/var/tmp
EDITOR=/usr/bin/vi
VISUAL=/usr/bin/vi
EXINIT=set shell=/bin/csh magic redraw
TERM=vt100
TERMCAP=vt100:do=^J:co#80:li#24:cl=50\E[;H\E[2J:sf=2*\ED:le=^H:bs:am:cm=5\E[%i%d;%dH:nd=2\E[C:up=2\E[A:ce=3\E[K:cd=50\E[J:so=2\E[7m:se=2\E[m:us=2\E[4m:ue=2\E[m:md=2\E[1m:mr=2\E[7m:mb=2\E[5m:me=2\E[m:is=\E[1;24r\E[24;1H:if=/usr/share/tabset/vt100:rs=\E>\E[?3l\E[?4l\E[?5l\E[?7h\E[?8h:ks=\E[?1h\E=:ke=\E[?1l\E>:ku=\EOA:kd=\EOB:kr=\EOC:kl=\EOD:kb=^H:ho=\E[H:k1=\EOP:k2=\EOQ:k3=\EOR:k4=\EOS:pt:sr=2*\EM:vt#3:xn:sc=\E7:rc=\E8:cs=\E[%i%d;%dr:
TTY=/dev/wina0
WIND_NAME=Terminal 1
DISPLAY=:0
To change the default editor from vi(1) to ex(1), for
example under csh(1), type:
setenv EDITOR /usr/bin/ex
The environment default settings have been carefully chosen to minimize
difficulties for users new to UNIX. Be careful not to unwittingly change
these parameters. To return to default settings, simply restore the original
.profile or .login and .cshrc files.
5.5 Quitting CodeBuilder
Selecting Quit from the File Menu can be used to quit CodeBuilder without
restarting the MacOS. CodeBuilder can subsequently be launched again. The
command reboot will kill all of the UNIX processes, and then quit
CodeBuilder. The -q option to reboot will quit CodeBuilder
immediately without attempting to kill the other UNIX processes. To provide
a degree of remote control (via CodeBuilder) to restart the MacOS, use reboot
with -M. Halt behaves like reboot, except that
after killing the UNIX processes (if no -q option), the Macintosh
is shut off (like Finder selecting Shut Down).
When the Finder is used and either Restart or Shut Down is selected from
the Special menu, CodeBuilder invokes /sbin/reboot to kill the
UNIX processes and then quit CodeBuilder. Control returns to the Finder
to Shut Down or Restart as appropriate.
When CodeBuilder menus are used and the item Quit under the File menu is
selected, CodeBuilder invokes /sbin/reboot. Holding the Shift key
while selecting this item invokes /sbin/reboot -q. This also holds
for the hot key <Command-Q> and <Shift-Command-Q> combinations
respectively.
5.6 Login Accounts
Since CodeBuilder is based on UNIX, it is possible to support multiple users.
Each user has a user name and a password. The password is used to convince
the system that the users are really who they say they are. While login
names are used for a variety of public purposes passwords are meant to be
kept as private as possible and therefore are not echoed by the system.
Having individual login accounts enables each user to have a customized
working environment.
5.6.1 The Concept of a Home Directory and a User Environment
When users are given accounts on a UNIX system they are assigned individual
and group IDs and are given a node in the directory tree structure. This
node (also called the user's "login directory" or "home directory")
designates a private storage area for that user. In addition, a "user
environment" is established for each user. The user environment is
governed by the user's choice of UNIX shell (see section "5.6.2
The UNIX Shell") and associated login file(s) placed in the user's
home directory. The parameters that describe each user account are kept
in a special password file, /etc/passwd (see passwd(5)),
described in the sections "5.6.7 The Password
File" and "5.6.8 The Group File".
CodeBuilder supplies a utility program (adduser(1)) for establishing
login accounts and home directories. (See section "5.6.6
Setting Up User Accounts".)
5.6.2 The UNIX Shell
The UNIX shell is the UNIX command interpreter. When you type commands in
a CodeBuilder terminal window, you are communicating with the shell. CodeBuilder
provides the following shells:
- · C Shell(csh(1)): A shell with C-like syntax.
- · T-C Shell (tcsh(1)): An improved, more interactive
csh.
- · Bourne Shell (sh(1)): A compact shell using less memory.
- · Bourne Again Shell (bash(1)): An improved, more interactive
shell with Bourne syntax.
If you have already logged in as root, you are running under the
C shell (called csh). All of these shells provide powerful execution
environments, supporting programming languages that include control-flow
primitives, parameter passing, variables, and string substitution. The Bourne
shell is more compact and uses less memory. Both sh and bash
rely on a .profile file in the user's home directory, while csh
and tcsh use the .login and .cshrc files to determine
the user's environment. As part of establishing a user account you may stipulate
a particular shell by specifying the appropriate parameter to the adduser
script, or you may change shells at a later time using the chsh <username>
command.
5.6.3 Superuser and Privileges
Intrinsic to each login is the concept of login privileges. When you are
logged in as root you are the most privileged user on the system
- the superuser. The superuser has access to and authority over
system resources that are not available to all users. The superuser has
access to private user data, can add and delete users from the system, and
can provide support when a user has forgotten his or her password.
You can become superuser by logging in as root or by typing "su"
when logged in as a normal user. In order for an ordinary user to become
superuser, access must be granted via the "wheel" group
in /etc/group(5).
If an ordinary user is also system administrator, it is advisable to log
in as superuser only when doing administrative tasks and to revert to the
normal user login otherwise. This is a security precaution to ensure that
key system resources are not inadvertently destroyed. When logged in as
an ordinary user, typing su will enable you to become superuser
for performing tasks that require extra privilege.
$ su
Password: your_root_password
. . . privileged operations . . .
# ^D
$
Note that the system prompt for an ordinary user is different than the superuser
or root prompt. This difference will remind you to exit from su
once administrative tasks have been completed. Read the next few sections
and then set up an account for yourself and for any others that will be
using the system. When you are setting up login accounts, you can give certain
users the privilege of becoming superuser.
5.6.4 A Word About Security
Since CodeBuilder is implemented as an application on a non-secure operating
system (MacOS), the traditional UNIX-style security is not enforced by Macintosh
applications. However, since CodeBuilder imposes traditional UNIX permissions
on files and supports traditional UNIX password protections, CodeBuilder
files are protected from users and CodeBuilder permissions are enforced
on files within an FFS. For CodeBuilder files residing in the Macintosh
file system, traditional Macintosh security software, such as FolderBolt,
works well.
5.6.5 The Root Password
In a newly installed CodeBuilder system, the root is associated
with the password "CodeBuilder". If you are concerned about security,
you should immediately invoke the passwd(1) program and change
the password for the root login. This is done by typing the following:
#passwd
New password: <new_root_password>
Retype new password: <new_root_password>
5.6.6 Setting Up User Accounts
A user account is added to the system using the adduser(1) command:
adduser username [-g gid] [-u uid] [-p passwd]
[-n user] [-d home] [-s login]
-g (gid) Group id of the new user.
-u (uid) User id of new user.
-p (passwd) Text form of the user password; default is username.
-n (user) Specifies user information, e.g. "John Brown";
default is username.
-d (home) Specifies the user's home directory; default is /home/username.
-s (login) Specifies program to run as login shell; default is
/bin/tcsh
Only the username is required; adduser will assign default
values to the remaining parameters. A group id of 20 is suggested for user
accounts. As an example, to establish an account for user Laura in group
20, enter:
adduser Laura -g 20
Adduser creates default .login and .cshrc files
for the new user. A portion of the .cshrc file is shown in Figure
15.
Once the system recognizes a user, it sets the current working directory,
executes a series of commands to perform any automatic startup processing
and prints a prompt ($)Ý indicating that the
system is waiting for input.
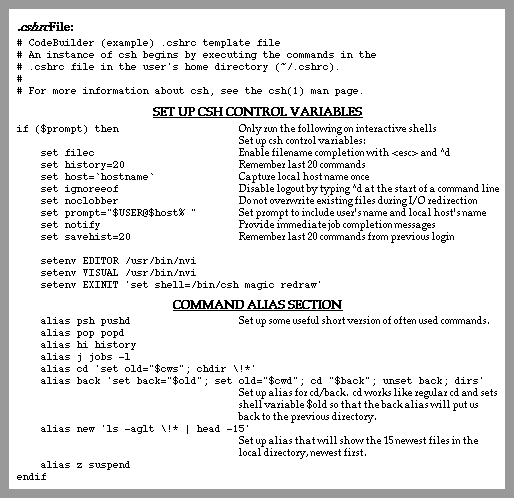
Figure 15. .cshrc File
Ý: The '$' prompt is the default prompt
for sh(1) users; for csh(1) users, the default prompt
string includes your user name, host name, and the '%' character
in the form: username@host%
5.6.7 The Password File
When set up as a user, you should add a password using passwd.
In 4.4BSD, the /etc/passwd(5) file is an ASCII file which is a
shadow of the actual password database file. Do not make changes to this
file. Use the passwd, chpass, and chroot commands
to make changes to the actual password database, which will automatically
be reflected in the /etc/passwd file!
The /etc/passwd(5) ASCII file contains entries for the following:
name (login name, contains no uppercase)
dummy password field
numerical user ID
numerical group ID user's real name, office extension, home phone
home directory
program to use as shell
Each field is separated by a colon. Each "user" is separated by
a new-line. Since CodeBuilder uses shadow passwords, the real password is
stored in /etc/master.passwd and the password field consists of
a single asterisk in the /etc/passwd file. If the shell field is
null, then /bin/sh is used. If a user forgets his or her password,
the system administrator can change their password using the chpass command.
Each user should have a unique user ID.
Notice also that root has selected the C shell. By using the chpass
command, you can change the root default shell to the Bourne shell.
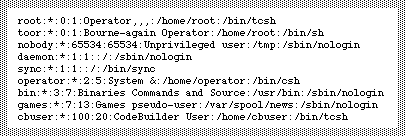
Figure 16. The /etc/password File
5.6.8 The Group File
The /etc/group(5) file is used to organize users into groups in
order to control system access and authorizations. Groups are defined by
entries in the /etc/group file. Each entry has the following fields:
name
encrypted password
numeric group id
authorized users (separated by commas)
The fields are separated by colons. The authorized user list is optional.
It provides a way for users to belong to multiple groups. The encrypted
password is usually an asterisk, preventing use by means of a password.
Figure 15 shows how the /etc/group file looks when CodeBuilder
is first installed. This is the file used to designate group affiliations.
The first line in the /etc/group file is the "wheel"
entry, for people with total access to system resources or root privileges
- the "big wheels". Only users listed for "wheel" group
are allowed to become superuser with the su(8) command. You may
want to establish separate logins for members of a project team and give
all members access to the project files.
An entry for an accounting group with two members would be as follows:
accounting:*:17:shawn,lauren
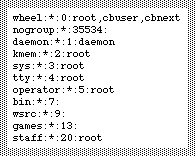
Figure 17. The /etc/group File
5.6.9 Administrative Login Accounts
It is customary to set up special administrative accounts with varying degrees
of privilege. These accounts are used by system administrators or by programs
to perform specific administrative tasks. The default CodeBuilder /etc/passwd
file contains the following accounts:
root:*:0:1:Operator,,,:/home/root:/bin/csh
toor:*:0:1:Bourne-again Operator:/home/root:/bin/sh
nobody:*:65534:65534:Unprivileged user:/tmp:/sbin/nologin
daemon:*:1:1::/:/sbin/nologin
sync:*:1:1::/:/bin/sync
operator:*:2:5:System &:/home/operator:/bin/csh
bin:*:3:7:Binaries Commands and Source:/usr/bin:/sbin/nologin
games:*:7:13:Games pseudo-user:/var/spool/news:/sbin/nologin
cbuser:*:100:20:CodeBuilder user:/home/cbuser:/bin/tcsh
cbnext:*:101:20:CodeBuilder 'Next' user,,,:/home/cbnext:/bin/tcsh
Non-interactive
accounts for programs:
| nobody
| Default user id for unprivileged access.
|
daemon
| Owner of certain background processes that handle system services, such
as print spooler (lpr(1)).
|
sync
| Special login to update write buffers. Performs a sync and logs out.
|
bin
| Owner of most standard commands.
|
games
| Used for ownership of high score files and other game related miscellany.
|
User accounts:
|
root
| Login for superuser. The home directory is / and the shell is /bin/csh.
|
toor
| Alternate login for superuser. The home directory is / and the shell
is /bin/sh.
|
operator
| Provides an account for system administration without full root privileges.
|
cbuser
| The default account provided for code development.
|
cbnext
| The default account provided for Objective-C development.
|
5.6.10 Disabling User Logins
If the file /etc/nologin exists, no logins (other than root) will
be allowed on your system. See login(1).
5.6.11 Removing Users
Removing a user involves removing the entry from the /etc/master.passwd
file, rebuilding the password databases with pwd_mkdb /etc/master.passwd
and deleting disk files. This may be a phased process. To prevent a user
from logging in, use the passwd command and change the password
string for the user, thus preventing any possible match. Then, when convenient,
perhaps after backing up, the deleted user's storage can be reclaimed.
5.6.12 Changing the Message-of-the-Day
As root or su you can edit the file /etc/motd.
If this file does not exist it can be created with the touch(1)
command. Whatever data you place in that file will be printed out each time
a user logs into CodeBuilder (except for the top two lines, which are edited
by the /etc/rc script at reboot and filled in with a version number).
5.6.13 Special Characters
A number of keyboard characters have special meaning in UNIX. The Special
Keyboard Characters chart in Figure18 will help you use the UNIX command
line environment.
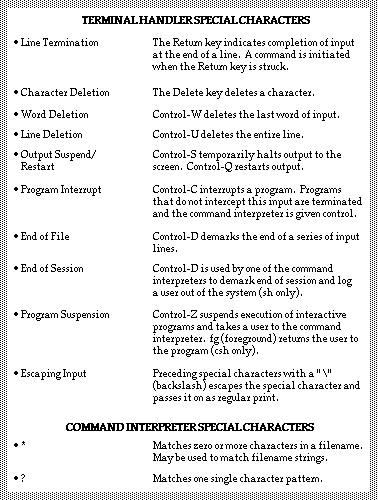
Figure 18. Special Keyboard Characters
5.7 Managing Your UNIX Environment
5.7.1 What's Running?
Since CodeBuilder runs multiple programs at the same time, there will be
times when you will want to see which programs are executing, how much system
time they are using, and, if they are not running, why not. The program
ps prints the process status of each of the Macintosh and UNIX programs
that are running. Figure 19 shows the sample output from a ps command.
5.7.2 Killing a Program
The kill(1) program is used in conjunction with the ps
program to abort the execution of a program. First, use ps to determine
the process id of the program that you wish to abort. Then use the kill
program with that process id to terminate that program. Occasionally, after
you execute kill, you may receive a message telling you that the
program actually terminated. This delay results from the fact that to terminate
a program, the program must be scheduled for execution and must terminate
itself. For example,
kill -9 47
would abort the macmnt daemon shown running in Figure 18.
5.7.3 Background Program Execution
Some programs execute for a long time. Rather than tie up a window, you
can start the program and let it run behind the scenes. To place a program
in "background execution", simply type an ampersand (&)
at the end of the command line. The shell will begin executing the program
and, rather than waiting for the program to complete execution before returning
a prompt, the shell returns immediately with a process id identifying the
program that started execution, and a prompt signifying that it is ready
to run another command. For example:
% grep ioctl *.c > found &
[1] 238
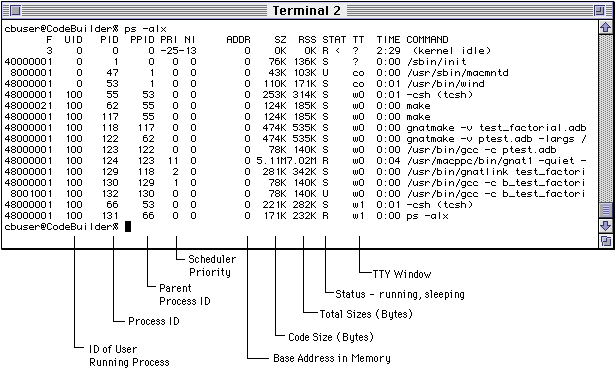
Figure 19. Using ps to Manage Your Environment
5.7.4 Shell Files
Many times you will find that you are executing a series of commands in
the same order with roughly the same parameters. Rather than typing that
set of commands each time, it would be useful to combine the commands into
a single file and hand the set of commands to the shell for execution by
simply specifying the file name. UNIX shell files provide that capability.
Use the editor to create a file called startup with the commands
date, who, and pwd. Here is an example using the ed
editor:
%ed (invoke ed)
#!/bin/sh
a (append text)
date
who
pwd
w startup (write to a file named startup)
q (quit)
%
To execute this file type:
%sh startup
Note that the commands are executed before the prompt is returned. If you
change the file permissions to allow the file to be executed, you can eliminate
the "sh". Type:
%chmod +x startup
This changes the mode of the startup file and makes it an executable file.
Now you can simply type:
%startup
and the commands within startup will execute. If you place startup in your
.login or .profile file (depending upon your standard
shell), these commands will be executed every time you log in.
The shell has a sophisticated command language to allow you to control and
parameterize the execution of a set of programs.
[ Top of Page ][ 6.0
The CodeBuilder File Systems ][ Table
of Contents ]