 Chapter 9.0 Continues...
Back to Sections 9.0 through 9.2.1.2
9.2.2 The Window Manager Client
9.2.2.1 Starting the Window Manager
9.2.2.2 Using the Mouse
9.2.2.3 Selecting a Window
9.2.2.4 Moving a Window
9.2.2.5 Changing the Size of a Window
9.2.2.6 Changing a Window Into an Icon
9.2.2.7 Moving an Icon
9.2.2.8 Restoring a Window From an Icon
9.2.2.9 Displaying a Window Menu and Making
Selections
9.2.2.10 Summary of Window Menu Functions
9.2.2.11 Raising a Window
9.2.2.12 Quitting the Window Environment
Chapter 9.0 Continues...
9.2.2 The Window Manager Client
The window manager is a program that runs with the X Window System and helps
you manage the windows on your screen. The window manager provides functions
for opening, closing, moving, and resizing windows. It's the window manager
that displays the three-dimensional frame around each window. Without a
window manager, your windows would not have borders and it would be difficult,
if not impossible, to perform many simple window functions.
The CodeBuilder X Window Software provides you a choice of olvwm(n),
the OpenLook Virtual Window Manager, twm(n), the Tab Window Manager,
and afterstep(n), . This section will discuss the operation of
olvwm. Refer to the online manual pages for more information on
afterstep and twm.
9.2.2.1 Starting the Window Manager
Your default client start up script (.xinitrc in your home directory
or /usr/X11/lib/X11/xinit/xinitrc) launches the window manager
when the X server is started. In combination, the X server, your X applications,
and the window manager comprise the X desktop.
The resources for the xterm client govern the precise size and
appearance of the terminal emulator window shown in the figures in this
section.
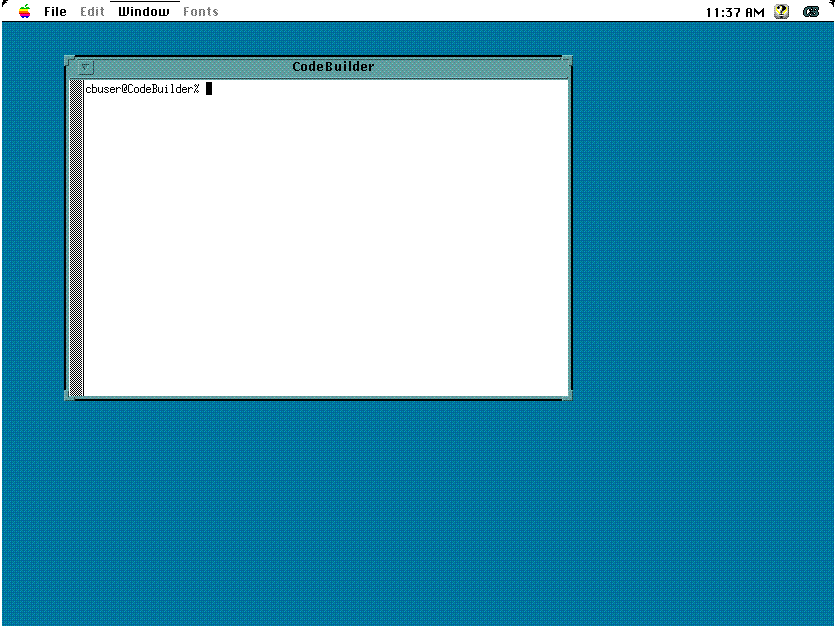
Figure 25. The OpenLook Environment
9.2.2.2 Using the Mouse
As you move the mouse on your X desktop, the pointer on the screen moves
correspondingly.
Whenever this section tells you to "point to" something, it simply
means move the mouse until the pointer on your screen is positioned over
the "something."
Pointer Shapes. The location of the pointer can
cause the shape of the pointer to change. For example, when the pointer
is directly over the root window (the backdrop behind all windows), the
pointer has an arrow shape. When you point to the inside of a terminal window,
the pointer changes to an "I" shape. When you point to the corner
of a window, the pointer changes to a circle shape.
Clicking, Double-Clicking and Dragging. The following
terminology is used to refer to actions involving mouse buttons:
- "Click" means to press and release a button without moving
the pointer.
- "Double-click" means to click a button twice in rapid succession.
- "Drag" means to press and hold a button while moving the
pointer.
9.2.2.3 Selecting a Window
Before a window can receive input from you, it must be selected as the active
window. To select a window, point to any part of the window.
When a window is active, the window frame changes appearance. Now, when
you press on the keyboard and the pointer is in that window, the characters
appear on the command line in the active window.
There are two different models of handling the mouse focus. The first, Focus
Follows Mouse, is the default behavior.
This behavior can be toggled by selecting "Focus" from the OpenLook
Workspace Menu..
Selecting this option changes the focus model to Click To Focus.
With this model, you must position the mouse over the window and then click
the select button (the select button is your mouse button or the left button
on a three button mouse) to focus.
If no window is active, everything you type is lost.
9.2.2.4 Moving a Window
Using the pointer, you can move a window to a new location on the screen.
To do so, grab the window's title bar with the pointer, drag it to a new
location, and then release the window.
Step 1 - Grab the Title Bar With the Pointer
Point to the title bar of the window. The title bar is the rectangular area
across the top of the window where the word xterm appears. When
properly positioned, the pointer is an arrowhead as shown in Figure 26.

Figure 26. Grabbing the Title Bar
When the pointer is positioned, press and hold the select button.
Step 2 - Drag the Window to a New Location
Still holding the select button, slide the mouse to the right across your
desktop. Now slide the mouse toward you.
As you move the mouse, the pointer on the screen drags an outline of the
terminal window as shown in Figure 27. The outline shows you where the window
will be moved when you release the mouse button.
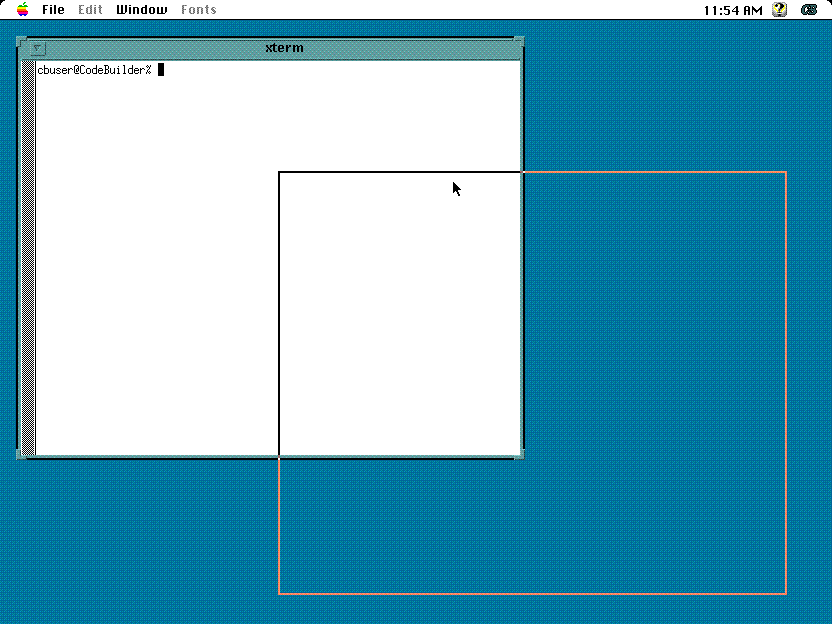
Figure 27. Repositioning the Window
Step 3 - Release the Window
Move the outline to the center of the screen. When the outline is where
you want it for now, release the mouse button. The window moves to the new
position.
9.2.2.5 Changing the Size of a Window
You can change the size of a window by grabbing an area of the window's
frame with the pointer, dragging the frame to the desired size, and then
releasing the frame.
Step 1 - Grab the Frame With the Pointer
Where you grab the window's frame determines how the window will be resized.
See Table 4.
Table 4: Places to Grab on the Window Frame
If
you want to stretch or shrink the window ...
| Point to ...
|
diagonally from the ...
|
|---|
bottom left
| frame's lower
left corner
|
top left
| frame's upper
left corner
|
top right
| frame's upper
right corner
|
bottom right
| frame's lower
right corner
|
For this exercise, point to the lower right corner of the window frame.
When positioned correctly, the pointer's shape changes to an circle around
the corner of the frame. Grab the frame by pressing and holding down the
select button.
Step 2 - Enlarge or Shrink the Window
With the select button still pressed, slide the mouse so that the pointer
moves away from the window. Now slide the mouse so the pointer moves toward
the window. As you move the mouse, the pointer on the screen drags an elastic
outline of the window. The outline shows you the new size of the window.
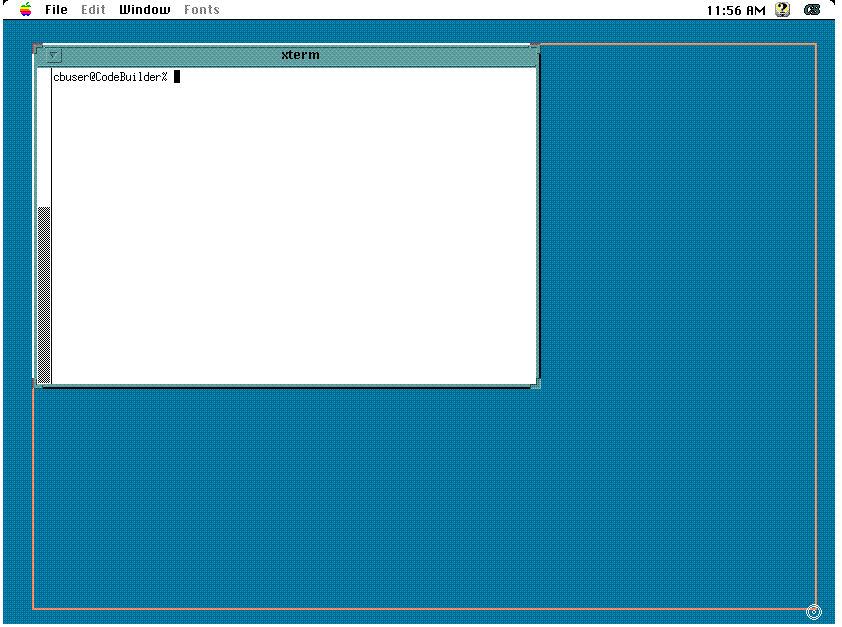
Figure 28. A Window and Its Elastic Outline
Now, stretch the window until it reaches the lower right corner of the root
window as shown in Figure 28.
Step 3 - Release the Frame
When the elastic outline is the correct size, release the mouse button.
The screen is redrawn with the window filling the outline.
9.2.2.6 Changing a Window Into an Icon
As you work, your screen can become cluttered with windows. Changing a few
of those windows into icons allows you to tidy up a cluttered workspace.
Icons are small graphical images. Programs executing in a minimized window
continue to execute until they finish or halt because they require input
from you.
Step 1 - Locate the Minimize Button
Slide the mouse so that you position the pointer on the minimize button
- the small square to the immediate right of the title bar on the window
frame as shown in Figure 29.
Figure 29. The Title Bar Minimize Button
Step 2 - Press the Minimize Button
Press the minimize button by clicking the select button. The window changes
into an icon. Olvwm displays icons in a row along the bottom of
the root window, starting on the left.

Figure 30. The OpenLook Icon
9.2.2.7 Moving an Icon
To move an icon around the screen, follow these steps:
- Point to the icon.
- Press and hold the select button.
- Still holding the select button, drag the pointer. An outline follows
the pointer, showing where the icon will be repositioned.
- To position the icon, release the mouse button.
9.2.2.8 Restoring a Window From an Icon
To restore an icon (change it back into a window), point to the icon and
double-click the select button. That is, press the button twice in rapid
succession.
The icon changes back into the window it originally came from. The window
positions itself where it was before being minimized, as shown in Figure
31.
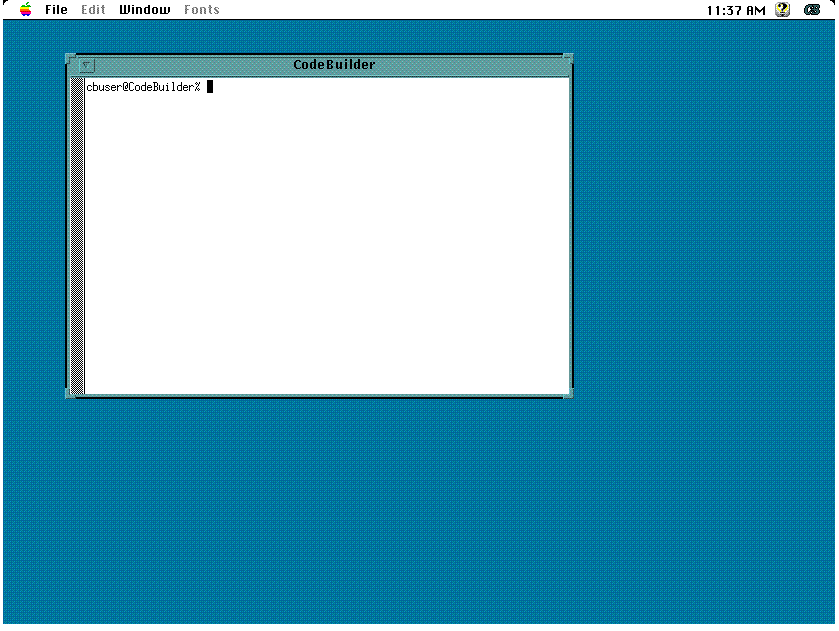
Figure 31. The Restored Window
9.2.2.9 Displaying a Window Menu and Making Selections
Each window has a window menu that contains functions for controlling the
window.
Step 1 - Display the Window Menu
The window menu is attached to the window frame and you use the menu button
in the upper-left corner of each window to display it.
To display the window menu, point to the menu button and then press and
hold the third button (See section 9.2.3.2 Mouse Button Mapping, Three
Button Mouse Configuration). The menu is displayed as
long as you hold the button down - don't release the button yet. See Figure
32.
Step 2 - Choose a Function From the Menu
While still holding the select button down, drag the pointer down the menu.
As the pointer moves, it highlights the button for each available selection.
Drag the pointer until you highlight the Full Size function. Release the
mouse button.
The Full Size function causes the window to expand to fill the entire screen
vertically.
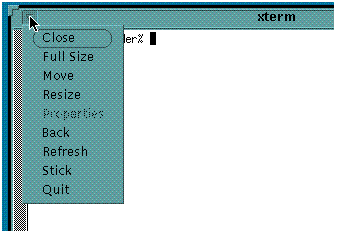
Figure 32. The OpenLook Window Menu
Display the window menu again (point to the window menu button in the upper-left
corner of the window and press the select button). Drag the pointer down
the menu until you highlight the Restore Size selection. Release the mouse
button. The window is restored to its former size and location. Table 5
lists the window menu functions.
9.2.2.10 Summary of Window Menu Functions
Table 5: Functions in the Window Menu
To
do this ...
| Choose ...
|
Restore a window from an icon or after maximizing.
| Restore Size
|
Change the location of the window.
| Move
|
Change the size of the window.
| Resize
|
Shrink the window to its icon representation.
| Close
|
Enlarge the window to be as tall as the root window.
| Full Size
|
Send a window to the back or bottom of the window stack, the position
closest to the root window.
| Back
|
Immediately stop the window and make it disappear
| Quit
|
When a menu function is meaningless, its name is grayed out and you cannot
select it.
9.2.2.11 Raising a Window
With the Focus Follows Mouse model, you can raise a window by simply
placing the mouse over the window.
With the Click to Focus model, you can bring a partially concealed
window to the front of the root window, by clicking on the window.
To demonstrate this with the Click To Focus model, create another
terminal window by typing this command in the existing terminal window:
xterm & <CR>
The new window appears in the upper-left corner of the display, partially
covering the first window as shown in Figure 35.
Step 1 - Position the Pointer
Position the pointer on any visible portion of the concealed window's frame.
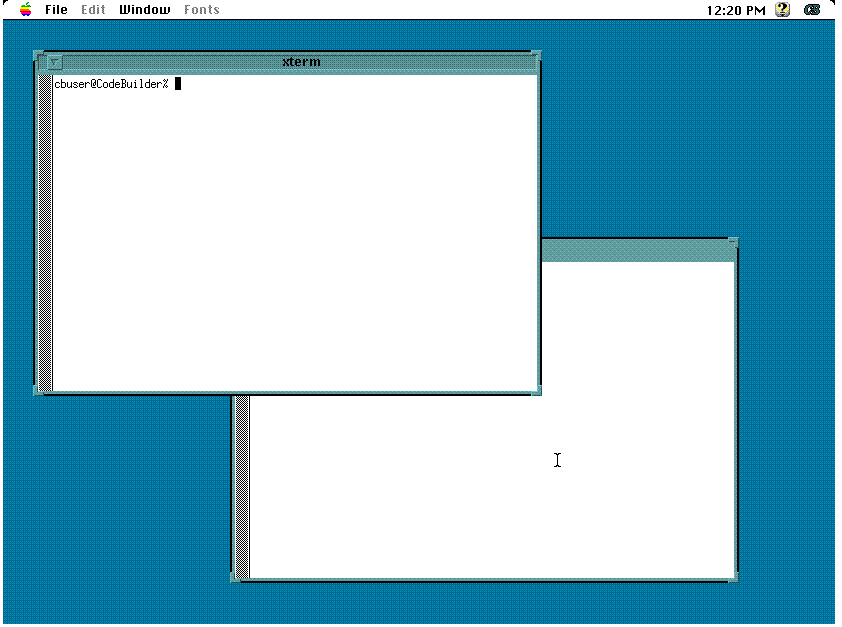
Figure 33. A Partially Concealed Window
Step 2 - Press the Select Button
Click the select button on the mouse. The partially concealed window moves
to the front of all other windows as shown in Figure 34.
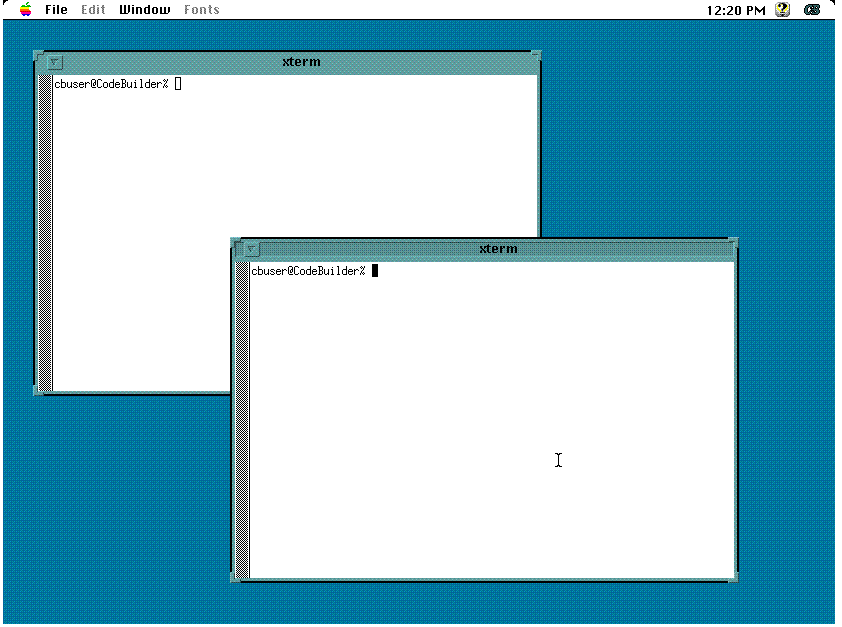
Figure 34. The Window Revealed
9.2.2.12 Quitting the Window Environment
Before exiting the window environment, exit any application programs and
stop any commands that may be running in terminal windows.
Pull down the File menu item from the CodeBuilder menu bar and select Close
Window. This removes from the screen all terminal windows (as well
as the windows for clocks and similar windowed programs) and terminates
the X server.
[ Top of Page ][ 9.2.3
The X Server Program ][ Table of
Contents ]