![]()
![]()
![]()
![]()
![]()
Setting Up a Mailing List
![]()
There are a number of activities associated with managing an owned mailing list, but by far the most important of these is the task of defining the attributes of the mailing list, including policies for subscription, unsubscription, and posting. In most cases, this will be a one-time operation, but you can modify your list’s settings at any time.
Mailing list attributes are set in the Mailing List Information Form, which is displayed by clicking a list address in the Owned Mailing List menu (described in Chapter 1). Although we’ve tried to keep all of the Post.Office web forms reasonably simple and brief, this particular form is extremely long and is loaded with dozens of fields that can get pretty complicated. We’ll take it one section at a time, with a series of illustrations that follow the form from top to bottom.
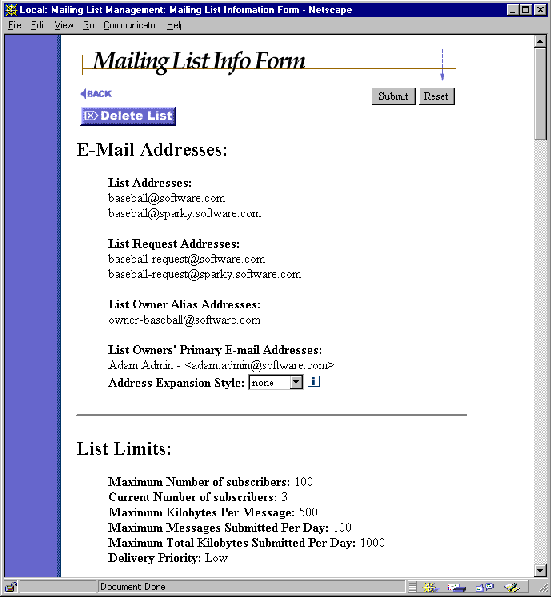
Figure 2-1: Mailing List Information Form (part 1 of 6)
This section contains a series of e-mail addresses associated with the mailing list. These addresses are defined by the Postmaster and cannot be modified by the list owner, and are shown on this form just for informational purposes.
List Addresses. These are the addresses to which users will send messages that are posted to the list. Most mailing lists have only one address, but they can have any number of additional addresses, with each address being equally valid for the list.
List Request Addresses. This field contains the address(es) for the administrative e-mail account (also known as the request handler) that corresponds to the mailing list. The request account is responsible for sending welcome and farewell messages, sending and receiving verification tokens, and receiving e-mail forms and commands for the mailing list.
List Owner Alias Addresses. This field contains addresses that provide aliases for the mailing list owner(s). Any mail sent to an address specified here will be forwarded to all owners of the list, including you. This provides a method for users to contact you as the list owner without knowing your personal e-mail address.
List Owners’ Primary E-mail Address. This field displays the address of each user who has been given ownership privileges for the mailing list (naturally, this should include you). All list owners have equal authority over the mailing list.
Address Expansion Style. Unlike the other information in this section of the form, you can modify this field, which controls the contents of the To: line in the header of outgoing mailing list messages. The three choices for this field are none, group, and expand. If none is selected, the destination address for mailing list postings is the primary list address. For example:
To: surfing@software.com
If the group expansion style is selected, the destination of the message includes the mailing list’s List Name, as well as the address of each subscriber to the list. For example:
To: surfing: jane.doe@software.com, joe.smith@software.com, ...
If expand is selected, the destination of the message includes the address of each subscriber to the list, but no mailing list address or description. For example:
To: jane.doe@software.com, joe.smith@software.com, ...
Another group of read-only fields, the List Limits section of the Mailing List Information Form shows you the limits that the Postmaster has set on you and your list. These limits include the following:
Maximum Number of subscribers. This limit sets the total number of subscribers your mailing list can have. Once your list reaches this limit, any new subscription attempts – by individual users or by you – will be rejected.
Current Number of subscribers. This information offers a handy comparison between the number of subscribers your list currently has and the maximum number of subscribers allowed for your list, which is shown above.
Maximum Kilobytes Per Message. This limit determines the largest message (in kilobytes) that Post.Office is willing to accept for posting to your list. Any message posted to the list that exceeds this limit will be returned to sender.
Maximum Messages Submitted Per Day. Post.Office keeps a count of the number of messages submitted to your list each day. If your mailing list is particularly busy today, and the number of submitted messages reaches this limit, any new messages submitted before midnight (when the daily counter is reset) will be returned to sender.
Maximum Total Kilobytes Submitted Per Day. Not only does Post.Office count the number of messages submitted to your mailing list, but it is also adds the size of each message to a daily total. As with the limit on the number of messages, if the total number of kilobytes from all the messages submitted to the list today reaches this limit, any new message will be returned to sender.
Delivery Priority. This isn’t actually a limit, but it is another Postmaster-defined field that list owners cannot modify. This field determines the priority of e-mail sent by the mailing list. The available values are Normal (processed the same as other messages) and Low (processed after all other messages).
The Postmaster may give your particular mailing list very high limits. However, just because you can have your mailing list flood the system with a lot of mail, that doesn’t mean that you should. Mailing lists that generate unusually high volumes of mail traffic can slow mail service for all e-mail accounts and mailing lists; such mailing lists are prime candidates for deletion by the Postmaster, who can revoke your list owner privileges at any time. So in addition to the above limits defined by the Postmaster, you should monitor the amount of activity on your mailing list to ensure that it doesn’t reach problem levels.
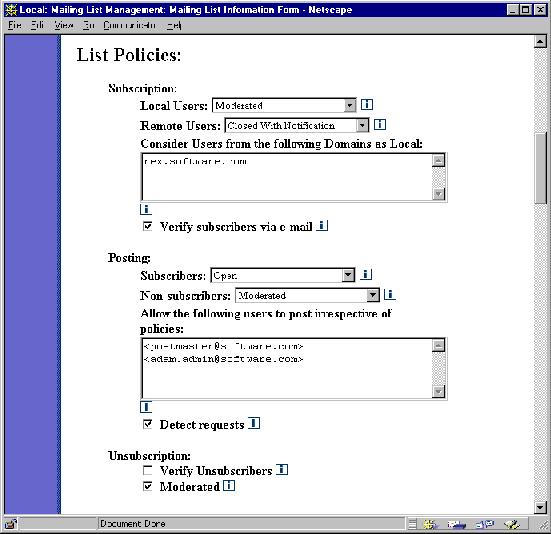
Figure 2-2: Mailing List Information Form (part 2 of 6)
These policies allow you to specify how requests for subscription to your list should be handled. You can choose to deny all requests, hold all requests for your approval or rejection, or just open it up and let folks subscribe themselves.
You can set different policies for local users (those with e-mail accounts on the Post.Office server) and remote users (the rest of the known world), which is useful when mailing lists deal with potentially sensitive information, as in the case of a company’s internal mailing list. For both local and remote users, a drop-down menu on the Mailing List Information Form specifies the policy for the appropriate class of users. The available subscription policies are:
If the subscription policy for remote users is set to Open or Moderated, the list becomes what is known as a public mailing list. The rather important implications of this phrase are discussed in Section 2.3.
Consider Users from the following Domains as Local. You can use this field to extend the subscription policy definition of "local" users to include some remote users by entering the domain of the chosen users here. Any remote user whose domain is listed here will enjoy the same subscription policy as folks who have e-mail accounts on your installation of Post.Office. For example, if this field contains the values
megahuge.com

dough-main.net

rover.software.com
then any user whose return address contains one of these domains – such as john.doe@megahuge.com – will have the same subscription rights to this mailing list as local users, even if they don’t have accounts in Post.Office.
Verify Subscribers via E-mail. When enabled, this option will attempt to verify the identity of all attempted subscribers before submitting their subscription requests. The verification is done by sending a message containing a verification token to the user’s e-mail address. By responding to the message and submitting the token, the user verifies that he/ she is who they claim to be.
This option is especially useful for public mailing lists, since users can claim to be anyone when requesting subscription. By verifying subscribers with this option, you can prevent mischievous computer users from submitting subscription requests on behalf of unsuspecting fellow commuters on the info autobahn.
Posting is a term used to describe the distribution of a message to the subscribers of a mailing list. The posting of a message is different from the submission of a message, which is when a user sends a message to the mailing list. The posting policies section of the Mailing List Information Form allows you to set rules for how (or if) a submitted message becomes a posted message.
As with subscription policies, there are two different posting policies for two different classes of people. With posting policies, the distinction is made between subscribers (official list members) and non-subscribers (the rest of the known world). The options for these two classes of users are the same as those for subscription:
Allow the following users to post irrespective of policies. As its label indicates, this field allows you to specify users who are allowed to post to your mailing list, regardless of policies. This means that you can close posting to subscribers and non-subscribers alike, and reserve the ability to post for yourself (or anyone else who you want to have this privilege). To grant this "super poster" status to a user, enter his or her e-mail address in this field. When a message is submitted to the mailing list, it will be immediately distributed to subscribers if the return address of the sender (defined in the From: header) is listed here.
Detect Requests. This posting policy allows you to filter out messages submitted to the mailing list which appear to be requests that were supposed to be sent to the list’s request account (this account is described in the E-mail Addresses portion of this form). As discussed in the Post.Office User’s Guide, users can subscribe and unsubscribe from a mailing list by sending commands via e-mail to the list’s Request Address. However, some users don’t quite understand this, and may mistakenly post e-mail commands to the mailing list, which can result in stacks of messages sent out to all of your list’s subscribers that contain nothing but the word "subscribe."
When the humor of this cluelessness wears off and it simply becomes an annoyance, you can enable the Detect Requests option, which will check each message posted to the list to determine whether it contains e-mail commands. A message is considered to be a request if the body of the message contains three or less non-whitespace lines, and the subject or body of the message includes any of the following words: subscribe, unsubscribe, add, delete. If a message is rejected because it contained a request command, the message will be returned to the sender and you’ll be notified of the event.
Unsubscription policies are similar to subscription policies, and include the following options:
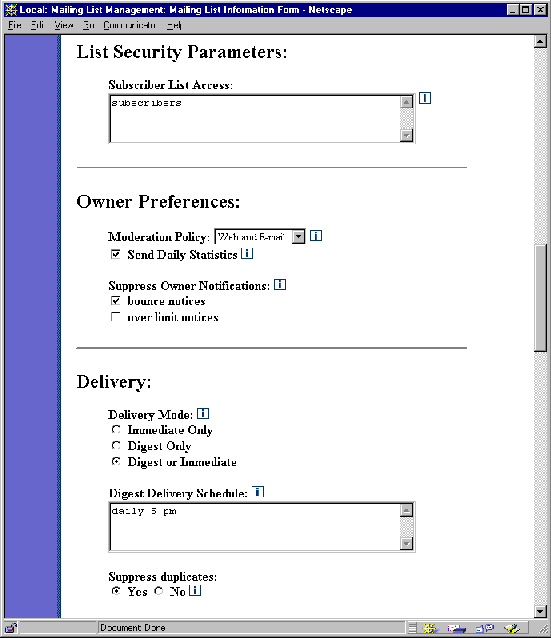
Figure 2-3: Mailing List Information Form (part 3 of 6)
As described in the Post.Office User’s Guide, the e-mail interface allows all users to request a copy of the subscriber list of any mailing list. However, there are many cases in which this data may be considered sensitive and inappropriate for public access. Post.Office therefore allows you to set rules for who can and can’t use the e-mail interface to get your subscriber list.
The Subscriber List Access field is similar to the account access and account and finger access rules described in the Post.Office User’s Guide. The following algorithm is used to determine if a user can access the subscriber list by submitting the who command via e-mail:
For example, if the list of Subscriber List Access Restrictions field for your mailing list contains
software.com

123.45.6.78

222.33.44.0
then users can retrieve the subscriber list from any machine in the software.com domain. It can also be retrieved from the machine with IP address 123.45.6.78, or from any machine with an IP address in the class-C network 222.33.44 (the 0 acts as a wildcard).
The fields in this section of the form allow you to determine how you want to interact with your mailing list. This is where you specify the types of notifications of mailing list activities that you want to receive, as well as the method you’ll be using to moderate the list.
Moderation Policy. If you decide that you want to moderate postings, subscription requests, or unsubscription requests, then this field specifies the method that you will use for that moderation. This one field sets your preference for dealing with all three types of moderation, so whatever you intend to moderate will be handled as you request here.
The available moderation methods are:
The implications of these moderation modes are discussed in more detail in Chapter 3, which covers the tasks involved with moderating messages, and subscription and unsubscription requests.
Send Daily Statistics. This field controls whether you receive a daily report on the activity of your mailing list. This statistical report, which is sent daily at around midnight, is discussed in Section 2.4.1. To receive the daily report, enable the check box for this field.
Suppress Owner Notifications. These fields allow you to specify that you don’t want to receive certain list owner notifications. By default, you’ll receive a notification from your mailing list whenever a list operation is disallowed because Postmaster-defined limits have been reached; for example, if a user requests subscription when the list is already at its maximum number of subscribers. You’ll also receive a notice whenever a list posting is bounced (returned) by another mail server; for example, when a subscriber’s account is unreachable. You can elect not to receive these notifications by enabling the Bounce Notices and Over Limit Notices fields.
The fields in this section of the form control options for the delivery of postings to your list’s subscribers.
Delivery Modes. This option determines the delivery types available to subscribers. The three choices are: Immediate only, Digest only, and Digest or Immediate.
The immediate mode of delivery is just that: immediate. When messages are posted to the mailing list, they are immediately sent out to all of the list’s subscribers who have selected this delivery mode. This is great for important mailing list postings, such as an announcement to all employees that your company is being sold. However, for more trivial mailing list postings – like the fourteenth message in a debate on whether ferrets or hedgehogs make the better house pet – the immediate mode of delivery is unnecessary, and you may find it annoying to have such messages trickling in one-at-a-time with the rest or your e-mail.
Enter the digest mode of delivery. The idea behind the digest mode is that you receive all messages from the mailing list for a certain time period in one great big message. All mailing lists that support the digest mode of delivery have a corresponding digest schedule, which defines the days and times that the digest is sent out. When the appropriate hour comes, all subscribers using this mode of delivery are sent a digest message that includes the contents of all of the messages posted to the list since the previous digest was sent. The most common digest schedule is daily at a specific hour, but the list owner can specify any days of the week, and any hours in the day, for their list’s digest delivery.
In most cases it is preferable to allow both delivery modes, but you should choose whatever makes the most sense for the type of mailing list you are trying to run.
Digest Delivery Schedule. If you support the digest mode of delivery, use this field to specify a schedule for the distribution of the list’s digest. By default, the digest will be distributed daily at midnight, but you can schedule any number of days and/or hours during the week when you want delivery to take place.
Days of the week are specified in this field by entering the first three letters of the day in all lower-case type (for example, "tue" for Tuesday). Hours are specified as single digits, can include "a.m./p.m." or "am/pm.", and can be given in 12-hour or 24-hour format. Minutes cannot be specified when setting a digest schedule, just days and hours.
For example, each of the following examples specifies a delivery time of Monday at 5:00 p.m.:
mon 5 pm

mon 5 p.m.

mon 17
In addition to specific days, the digest delivery schedule can also be given as daily or weekly. The daily option delivers the digest every day at the specified time, or at midnight if no time is specified. The weekly option delivers the digest each Sunday at midnight, or each Sunday at the specified time. If the delivery schedule is given as a time with no day, the delivery schedule is daily at the given time.
Suppress Duplicates. This option provides a method for preventing users from getting multiple copies of messages sent to the mailing list. By default, if a message is sent to both an individual user and a mailing list that the user is subscribed to, the user will get two copies of the message: one from the sender, and one from the mailing list. By suppressing duplicates, you can prevent users from unnecessarily receiving multiple copies of a single message.
When duplicate suppression is enabled, users will get only one copy of a message even if the message is delayed or altered by the list owner. For this reason, suppression of duplicates may not always be desirable. Like many other list features, whether or not you use this option depends on the type of mailing list you’re running.
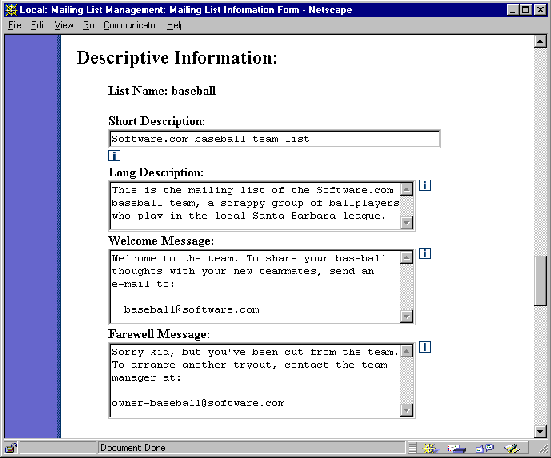
Figure 2-4: Mailing List Information Form (part 4 of 6)
This section of the Mailing List Information Form contains an assortment of descriptions and messages relating to your mailing list.
List Name. This unique name identifies the mailing list in the e-mail interface. The List Name is established by the Postmaster at the time the list is created and cannot be changed.
Short Description. This is an optional short description or title for the mailing list. This short description is displayed with the list address in several forms in the web interface, including the Subscription Form and Mailing List Summary Form. You can enter up to 80 characters in this field.
Long Description. This is another optional description of the mailing list. This long description is displayed in the Mailing List Summary Form for the mailing list, and is returned to users who submit the info command in the e-mail interface. There is no limit to the number or type of characters that can be entered in this field.
Welcome Message. This field contains the message that is sent to all new subscribers of your mailing list. The welcome message typically includes information such as the list address, a description of the list, the List Name, and an e-mail address that folks can use to contact you. There is no limit to the number or type of characters that can be entered in this field. If you would rather not have a welcome message sent to your subscribers, leave the field blank to disable this feature.
Farewell Message. Similar to the welcome message, the farewell message is sent to your subscribers after they have been removed (voluntarily or otherwise) from your list. If you would rather not have a farewell message sent to your subscribers, leave the field blank to disable this feature. Note that this message only applies to unsubscription operations; if you or the Postmaster delete your mailing list from Post.Office, no farewell message is sent.
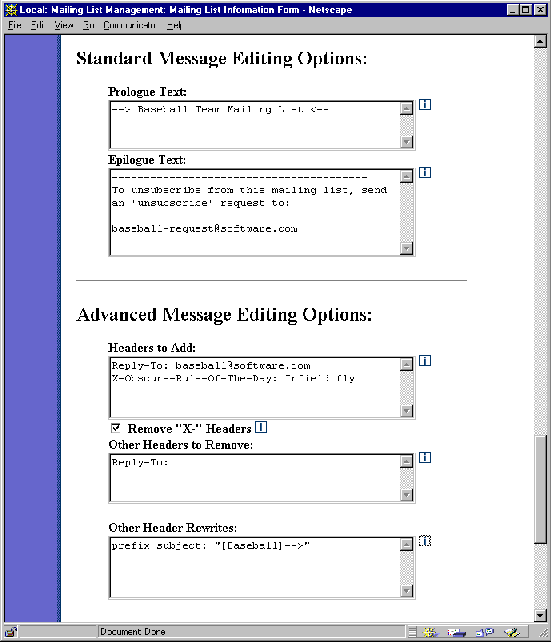
Figure 2-5: Mailing List Information Form (part 5 of 6)
These fields allow you to specify text that will be inserted before and after the body of each message posted to your mailing list. The text in the Prologue Text field is inserted before the body of the message, and the text from the Epilogue Text field is inserted after the message body.
It’s completely up to you to decide what you want to include in these fields, which have no limit to the number or type of characters that can be entered. Mailing lists typically use the prologue to mark "official" mailing list postings, and include in the epilogue instructions for contacting the list owner or submitting e-mail commands. However, there aren’t really any rules, so enter whatever you want.
The options in this section pertain to the adding or removing of e-mail headers. All of these fields are optional, and in general should be used only by list owners who are well versed with the standards for specifying optional e-mail headers.
Headers to Add. This field allows you to add headers to each message posted by the mailing list. As with Prologue Text, inserting a message header can be used as a way to mark "official" list postings. You can also use this field to specify a reply-to header, which allows mail clients that support this option to automatically address replies to mailing list postings to the mailing list itself, instead of the to the author of the message. The syntax for each header entered in this field must be valid according to RFC-821, like the following:
X-Mailing-List-Manager: Post.Office

Reply-To: surfing@software.com
Remove "X-" Headers. When enabled, this option removes all message headers that start with "X-" from messages before they are posted to the mailing list. Some mail clients add this type of header to messages, which in rare cases can cause incompatibilities between mail clients.
Other Headers to Remove. Any other RFC-821 style headers specified in this field will also be removed from messages before they are posted to the mailing list. When using this option, specify only the header itself, and not the text to the left of the header. For example, you may enter
Reply-To:
and not
Reply-To: some.address@software.com
There is no wildcard matching in this field, so to be removed a header must be identical character-for-character to a value in this field.
Other Header Rewrites. This field allows you to insert a prefix or suffix into the text of an existing header. Although all headers may be rewritten with this feature, it is only recommended for use with the subject header. By inserting some text before or after the original subject of a mailing list posting, you can allow subscribers to easily identify list-related messages and use mail filters to sort them.
To request header rewriting, enter the keyword prefix or suffix, followed by the header that you want to rewrite (i.e., Subject:), followed by the text of your prefix/suffix enclosed in "double quotes". For example, you might enter a prefix such as
prefix Subject: "[Surf list] "
or a suffix such as
suffix Subject: "-(Cycling list)"
When a header is rewritten, its original text is preserved just as the original sender wrote it; the text specified in this field is merely inserted immediately before or after the user-defined text. For example, using the rewrites specified above, a message with the subject "go this weekend?" would have the following respective subjects when sent to subscribers:
Subject: [Surf list] go this weekend?

Subject: go this weekend?-(Cycling list)
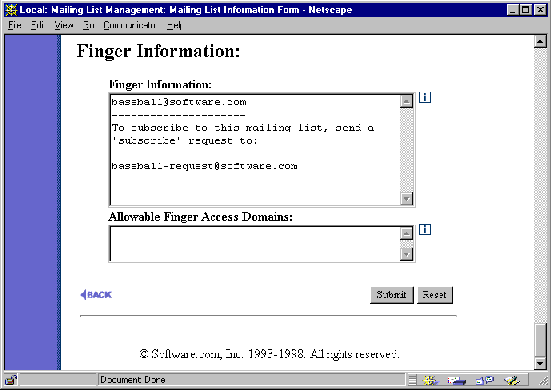
Figure 2-6: Mailing List Information Form (part 6 of 6)
Like your e-mail account, your mailing list can have finger information associated with it, which is specified in this section of the Mailing List Information Form.
At some point, you will probably want to add some subscribers to your mailing list. You may also be curious about who is already subscribed to the list. You can carry out such subscriber-related activities via the List of Subscribers Form, which is displayed by clicking on the Edit Subscriber List link for the appropriate mailing list on the Owned Mailing Lists menu.
The List of Subscribers Form includes fields for adding and removing subscribers, and looks like the following:

Figure 2-7: List of Subscribers Form
To add subscribers, enter an e-mail address for each new subscriber in the Subscribers to Add field, and select a delivery method for these subscribers. To remove subscribers, enter the address of each soon-to-be non-subscriber in the Subscribers to Delete field. To commit the changes to your subscriber list, submit the form.
Subscribers added or removed in this manner are exempt from the intermediate steps endured by users who attempt to subscribe or unsubscribe themselves. This means that no verification or moderation will take place for these users, even if the policies for the list include those options. If a list has closed subscription policies, users can still be added to the subscriber list in this form.
If your mailing list’s subscribers number 50 or less, they will be displayed at the bottom of the List of Subscribers Form. However, since huge subscriber lists can take a long time to display, Post.Office won’t display them here if there are more than 50 subscribers. In this case, you can view the subscriber list by clicking on the View Current Subscribers link. This displays the View List Subscribers Form:

Figure 2-8: View List Subscribers Form
The e-mail address and delivery mode of each subscriber are given here. Use the A-Z links to search through subsets of subscribers, or click on the All link to view a list of all list subscribers.
To return to the List of Subscribers Form, click on the Edit Current Subscribers link. If you want to go all the way back to the Owned Mailing Lists menu, click the
![]() link.
link.
A mailing list is referred to as "public" if its subscription policies allow users without mail accounts in Post.Office to subscribe to the mailing list (recall that there are separate subscription policies for users with and without e-mail accounts on the Post.Office mail server). These users – known as remote users – do not go through the same interface to subscribe to mailing lists as users who have Post.Office accounts. Since they don’t have a mail account, remote users cannot log in to the system from the Authentication Information Form, so they can’t get to the same forms that you are privy to.
Nevertheless, remote users are still offered a web-based interface for subscribing to mailing lists hosted by the Post.Office mailing list manager. This interface can be accessed from the Authentication Information Form, which – as you should know by now – looks like this:
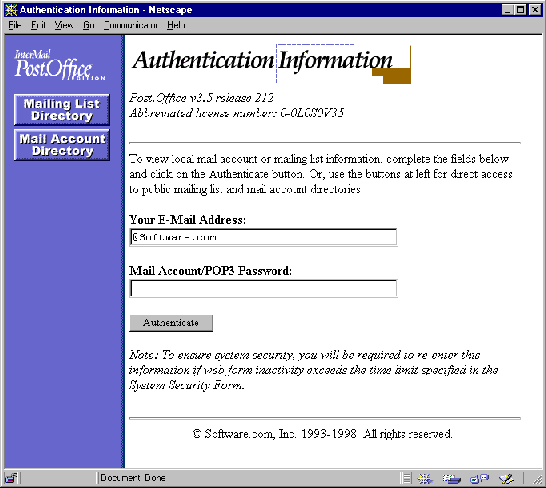
Figure 2-9: Authentication Information Form (notice the menu button at the top left)
To access the remote user interface to the mailing list manager, click on the Mailing List Directory menu button at the top left. This displays the Mailing List Directory menu for remote users.
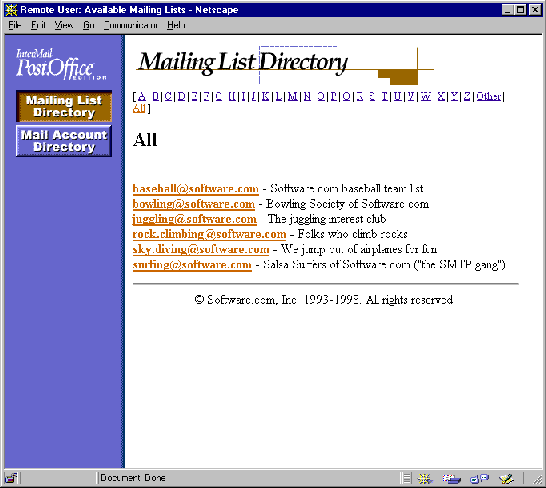
Figure 2-10: Mailing List Directory menu (remote user version)
This form is very similar to the local user’s List of Mailing Lists menu. Remote users can click on an individual list address in this menu to access a Mailing List Summary Form for that mailing list.
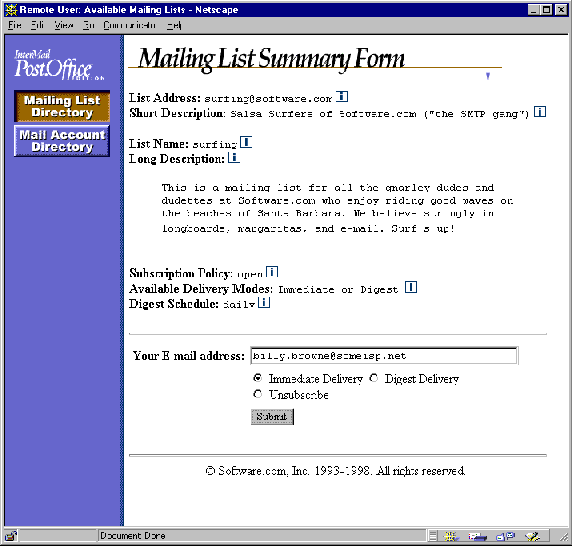
Figure 2-11: Mailing List Summary Form (remote user version)
Note that this form includes a text field to allow the user to enter his or her e-mail address when requesting subscription (or unsubscription). This information is required to process subscription requests by remote users because they did not provide an address and password in the Authentication Information Form, so the system has no way to identify them.
You may recall that when displaying lists of mailing lists, Post.Office filters out the mailing lists that have a closed subscription policy – the rule is that if you can’t join it, you can’t see it. This rule also applies in the case of remote users: if they can’t subscribe to a mailing list, they will not see the list or have access to its Mailing List Summary Form.
This means that if the list’s subscription policy for remote users is Closed, the URL for public subscription shown in the owner greeting message (shown in Chapter 1) is irrelevant, since there will be no form at that address. In the event that the subscription policy for remote users is changed to Open or Moderated, a Mailing List Summary Form for the list will then be available at the specified URL.
Being a good list owner means keeping track of what’s going on with your mailing list so that, when needs arise, you can take appropriate actions to keep the list running smoothly. To assist you in your administrative duties, Post.Office will send you various notifications to you via e-mail to alert you to specific events, or to give you an update of list activity. You can read or ignore these messages at your leisure, but you should probably check them occasionally for possible indications of a recurring problem.
The most regular type of list owner notification is a report of the day’s mailing list activity, which is sent to list owners daily at midnight. This daily statistical report includes subscription list data, posting numbers for the previous 24 hours, and a list of the top 10 contributors to the list.
The following is a sample of a daily mailing list report:
|
Daily statistics for surfing Tue, 14 Jan 1997
Total messages: 11 Total kbytes: 24 Total subscribers: 29 Total new subscribers: 0 Total unsubscribes: 0 Total forced unsubscribes: 0 Total messages waiting for approval: 0 Total subscribers waiting for approval: 1 Total unsubscribers waiting for approval: 0 6 contributors: <joe@software.com> (3 msgs, 5 kbytes, 27% of total msgs) <bob@software.com> (2 msgs, 6 kbytes, 18% of total msgs) <kris@software.com> (2 msgs, 6 kbytes, 18% of total msgs) <eric@software.com> (2 msgs, 5 kbytes, 18% of total msgs) <mark@software.com> (1 msgs, 1 kbytes, 9% of total msgs) <andrew@software.com> (1 msgs, 1 kbytes, 9% of total msgs) |
Among the information given in this message is the number of subscription requests, unsubscription requests, and messages that are currently waiting for your moderation. This information allows you to know when you should be logging into the web interface to perform your administrative duties.
As with postal mail, a fair amount of electronic mail gets returned to sender because its recipient is no longer at the same address, or because some other delivery problem occurred. When this happens with e-mail, the destination mail server will send a "bounce" message to the original sender explaining why delivery was unsuccessful.
Since mailing lists send e-mail to large numbers of users, they also tend to generate lots of return bounces from other mail servers. When this happens to your mailing list, the list will forward bounced postings to you for your inspection. The following is a typical bounce message:
|
"Surfing" received a bounce message. Most likely this occurred because a message sent out to the list (or a notice automatically generated by the list) was rejected by a remote mail server. Possible reasons for this rejection include a list subscriber whose account was closed, or a host that was down for an extended period of time.
If these bounce messages persist, manual intervention may be required to determine which subscriber is causing the bounces and unsubscribe that user from the mailing list. (bounce message attached) |
Bounce messages like this typically indicate that the subscriber’s account has been removed or disabled by their Postmaster, which means you should probably remove them from the subscriber ranks of your mailing list. Post.Office may actually do this for you if a subscriber’s account appears to be permanently unreachable; the Postmaster can request that any subscriber who is responsible for a certain number of these bounces be automatically removed from your mailing list.
As described in Section 2.1.2, each mailing list comes with a set of Postmaster-defined limits. These limits include the maximum number of subscribers to the list, the largest message that can be posted to the list, and the maximum number of messages per day. Whenever an operation is attempted that would cause your mailing list to exceed one of its limits, the operation is denied and you are notified of the event.
The following is an example of an over-limit notification:
|
anglers-request@software.com got a request to subscribe to the list anglers@software.com from <joe.schmoe@software.com>. Since the list is at its maximum number of subscribers, the request was denied.
Sincerely, anglers-request@software.com |
Over-limit notifications are important because they indicate that there is an unusually high amount of list activity, or that the limits on your list need to be increased. If you routinely receive over-limit notifications, contact your Postmaster to have your list’s limits raised.
Besides the notifications generated automatically by Post.Office, you may also receive messages from the Postmaster regarding your mailing list – especially if you are managing a large list that is impacting server performance. And, of course, as the person responsible for the mailing list, you may receive countless requests for information or instructions from users who do not have the benefit of the helpful information contained in this document. The bottom line is that list ownership involves getting a fair amount of mailing list-related e-mail; but then, you knew the job was dangerous when you took it.
A mailing list can have multiple owners, with each owner having equal authority to manage the list. However, ordinary users do not have access to add or remove owners for a mailing list; this level of access is restricted to the Postmaster. If you would like to change ownership of a mailing list, notify your Postmaster.
Although you can’t create mailing lists, you can delete a mailing list from Post.Office if you are one of the owners of the list. Lists can be deleted by clicking on the Delete List button shown at the top of the List Information Form (Figure 2-1). You will be asked to confirm the deletion before the list is removed from the system.
Remember that subscribers to your list will not receive the list’s farewell message when the mailing list is deleted. This is done to prevent mailing lists that are burdening the system from further impacting performance by automatically sending out a new round of messages. If you want to notify all of your users that the mailing list will be deleted, do so in a message posted to the list. You can also manually unsubscribe all users from the List of Subscribers Form – which causes each now former subscriber to receive the farewell message – before deleting the mailing list.
Post.Office ©Software.com, Inc. 1994-1998
![]()
![]()
![]()
![]()
![]()