|
|
|
|
||
|
Last time, I said that we'd be discussing how to add your webpages to your new WebTen webserving machine, forgetting one very important step before you do - the DNS. For every website your machine hosts under a different domain name, there must be a corresponding DNS entry. Fortunately for us, WebTen boasts the advantage of the BIND Domain Name Server, with all the inherent advantages that it's UNIX heritage offers. |
||
|
||
|
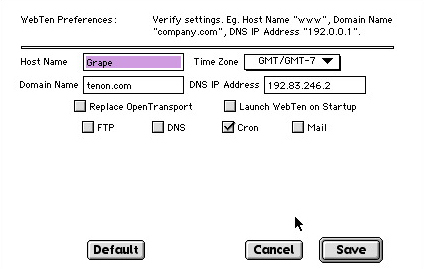
You can access the WebTen Preferences(fig.2) by either holding down the Option key while starting WebTen or by going to the File menu once WebTen is running. |
||
|
Once you see that WebTen has your domain name entered correctly within the preferences & the IP address you gave the machine is also listed, set the time zone & also select the options you want WebTen to take care of, like FTP, DNS (assuming you'll be running your own primary DNS), webmail & so on. The last thing you need to do here before sending WebTen on it's way, is to give your machine a name. You might like to give it a name like 'www' or as I did, 'server' Enter your chosen name (not including the quote marks) into the Hostname field & click the Save button. Now you'll see WebTen go through it's paces, with a progress bar indicating what's happening, like enabling DNS, FTP & so on. |
||
|
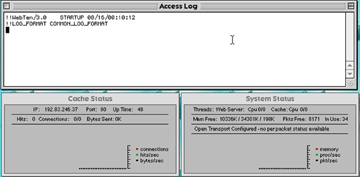
When that progress bar disappears, you'll see 3 separate windows appear(fig.3), Access Log, Cache Status & system Status: |
||
|
The Access Log window shows you the most recent things which have been requested by people on the Internet accessing the websites on your server. The Cache Status show simple things like how many hits you've had, current connections & data sent, as well as a graph which shows the status of your web server. The System Status window (strangely enough) shows you how your server is coping with the current load, with what threads are running & how much RAM is being used. Now, you're ready to test your server out. Load up the browser of your choice on the server & enter the IP address of the machine - you should see the WebTen homepage load up, giving you details of where manuals are & things like that, as well as telling you how to add your own content to the server. |
||
|
||
|
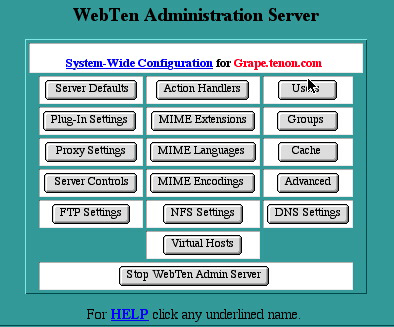
Now you've done that, go back to your browser & enter your domain name, then a / followed by webten_admin like so: http://yourdomain.com/webten_admin An authentication box with your username & password will pop up, so enter those & click OK then if the admin server isn't running, you'll see the same box again - fill it out again & you'll then be presented with the WebTen Admin Homepage(fig.5). This is the basic nuts & bolts part where you do all your server configuration, but for now, we're concentrating only on the DNS part.
|
||
|
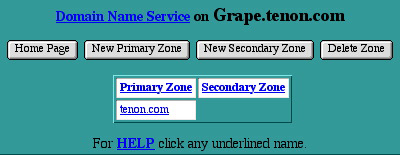
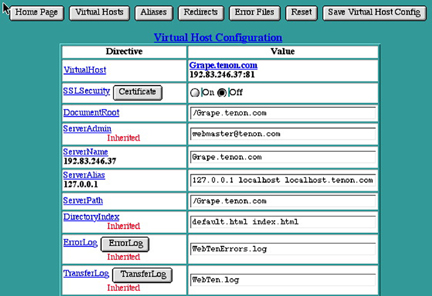
Now, you need to click the DNS button. A new page with your Primary Zone(fig.6) already filled out will be shown. Click on your domain name & a new window showing what's been added to your DNS Zone File(fig. 7) will appear. Now, add any entries you need to add by clicking on the New Host or New Alias & filling out the resulting box - don't panic, you can change or delete these later.
|
||
|
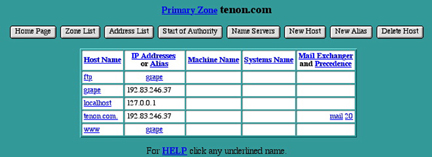
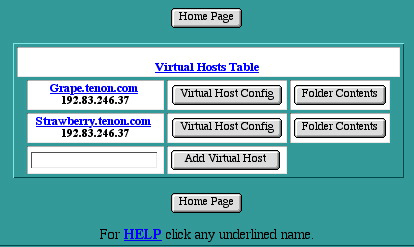
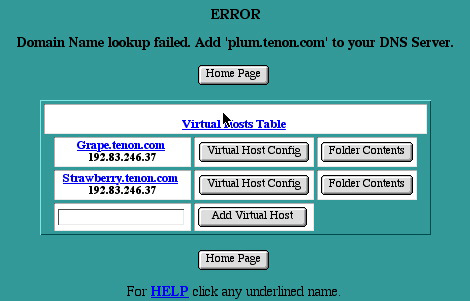
You'll be pleased to note that WebTen has kindly also added an MX Record (Mail Exchanger or Mail Server) entry under your domain name, saving you the trouble & also adding an alias for www, so you can use your server by either it's short domain name or by adding the www onto the beginning. Make sure to click the Save buttons after adding your entries or they won't be available. The bit you're no doubt champing at the bit for now is to get your website actually sitting on the server for people to come visiting. So, click on the Home Page button to return to the WebTen Admin Homepage & then on the Virtual Hosts button.
|
||
|
||
|
||
|
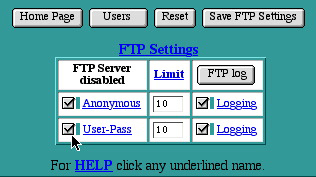
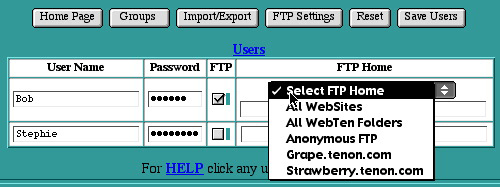
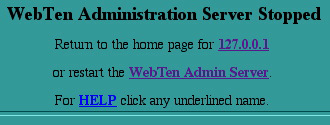
To test your FTP, open a new browser window & enter: ftp://username@yourdomain.com After you hit enter, a password box should pop up, enter the password & hit enter again & you should be in the directory you specified in the FTP options page of the WebTen Admin Homepage. Now, you can simply connect using your regular FTP client application from either the server itself or a remote computer & upload your site into that directory. All being well, you've made it right into the sometimes frighteningly complex world of web serving, made easier by Tenon having spent the time in providing a much less difficult way of controlling the Apache webserver. To test it out, enter your server's domain name into a web browser on either the server or a remote computer & bang! Thar she blows - your website's homepage should load right up. Congratulations. Finally, don't forget to shut down the WebTen Admin Server by clicking the Stop Admin Server Button(fig.5), which will then give you a confirmation page(fig.14).
|
||
| Next time, I'll be covering the surprisingly easy search engine included in WebTen - htdig. | ||
| Terry Allen is a WebTen user & runs hEARd - a non-profit organisation promoting new music. The hEARd site can be accessed at http://heard.com.au - currently running on WebTen 3.0.3 alongside the NetTen mail serving application. Alternatively, hEARd can be accessed at http://www.ozemail.com.au/~hmag/ |

| Tenon Home | Products | Order | Contact Us | About Tenon | Register | Tech Support | Resources | Press Room | Mailing Lists |

|
Copyright©2013 Tenon Intersystems, 232 Anacapa Street, Suite 2A, Santa Barbara,
CA 93101. All rights reserved. |