NFS on OSX Server
Using OS X Server to publish and mount NFS drive can be
complicated. Here are some steps to help an administrator as well as
some shortcuts when using iTools.
Overview
Publishing and mounting NFS drives consists of:
- Setting up NetInfo to have the appropriate values for publishing a
drive (only necessary if the option is not available in NetworkManager).
- Setting up the NetworkManager with the correct options for
mounting a drive.
- Rebooting both the server and the client.
- This paper also describes mounting NFS drives under iTools.
Exporting NFS Drives -- NetInfo Configuration
A default install of OS X will not have NetInfo or NetworkManager
properly configured to publish local drives. This is indicated by a
greyed out "New" button in the NetworkManager under File Sharing
--> Shared Directories.
If this button is not greyed out it should be fairly easy to make
a new export by simply clicking the button and filling in the
necessary info.
If it is greyed out, it is necessary to manually configure NetInfo
acording to this Apple Tech Note: Mac
OS X Server: Managing NFS Exports. In a nut shell:
- Start the NetInfoManager.app application.
- In the directory browser area, click on the exports directory.
If it is not already there then:
- Click on the root ("/") directory and select the "New
Subdirectory" command under the Directory menu.
- Rename the "new_directory" to "exports". To do this,
double-click on the "Value(s)" field corresponding to the
"name" property, and type in "exports".
- To add a new export, click on the exports directory and select
the "New Subdirectory" command under the Directory menu. It will
create a directory named "new_directory"
- Rename the "new_directory" to the path of the UFS directory
you want to export. To do this, double-click on the "Value(s)"
field corresponding to the "name" property, and type in the new
path.
- Add a "clients" property. To do this:
- Select an existing property and select the "NewProperty"
command under the Directory menu. Give it a name of
"clients".
- Give it a list of values of client machines you want to
export the directory to by selecting the "New value" from the
Directory menu.
- Add an "opts" property. For details on the values, see the man
page for exports(5). (a good value would be something like
root=<hostname> to give root permissions to root logging on
from that host).
- Do a save from NetinfoManager.app.
- Restart the server.
This is an example what the NetInfoManager should look like when
you are finished: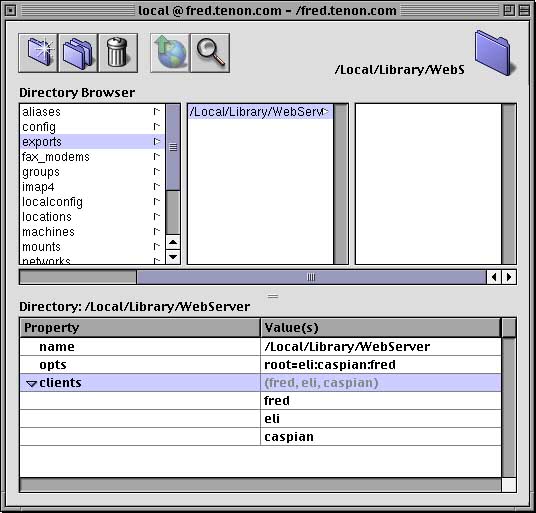
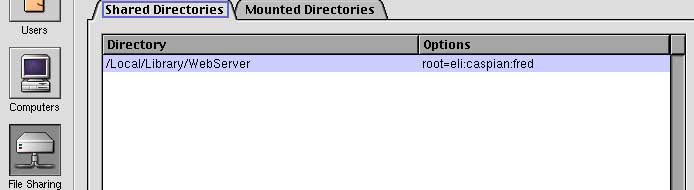
This is an example what the NetworkManager's Shared Directories
should look like when you are finished:
Once this initial configuration is complete, adding new
clients in the Network Manager is as easy as:
- Double clicking the directory you want to edit.
- Clicking the "Add" button in the dialog box that pops up.
- Naming the new client either <hostname>
,<hostname.domainname> or <IP.address>
- Saving the settings.
- Restarting the server or doing a "kill -HUP" on the "mountd"
process
Mounting NFS drives -- NetworkManager
This setup is much easier and we can use OS X Server's interface
as much as possible.
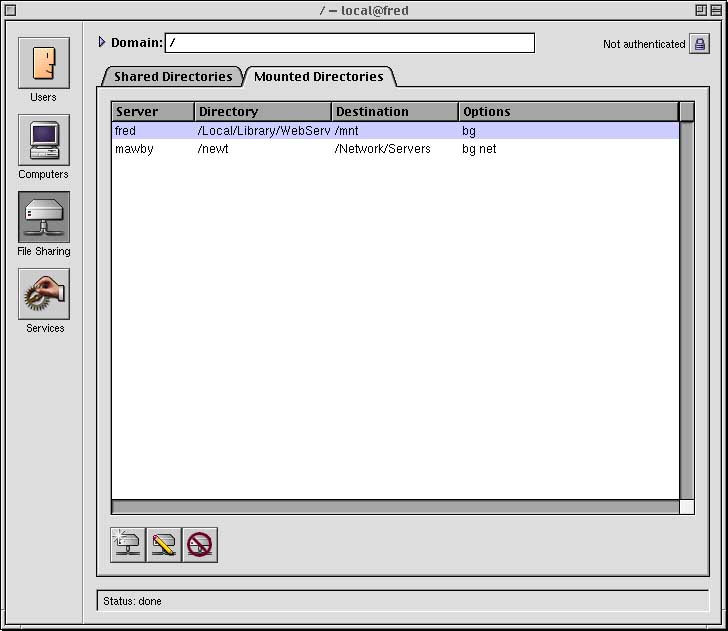
- Start the NetWorkManager application.
- Click on the 'Mounted Directories' tab, and then click the
'New' button at the bottom of the window.
- You will be prompted for information:
- The 'Directory to Import' needs to be in the form of
"servername:/directory". In the example hilited below,
"fred:/Local/Library/WebServer/WebSites" was entered.
- The 'Where to Import' is by default "/Netwok/Servers". This
is fine for most set-ups. In the example hilited below, "/mnt"
was entered.
- Remember that the "Directory to Import" must be configured
on the Server computer for this to work and that the complete
path must be entered into both computers.
- Restart the client.
That should do it.
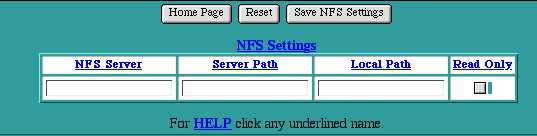
Mounting NFS drive through iTools
NFS drives may be mounted without a reboot by using the iTools
admin server.
- Start the itools admin server and access it though a web
browser.
- Click on the "NFS settings".
- Enter the server name into 'NFS server' and the path of the
folder you wish to mount in 'Server Path'.
- 'Local Path' is where you want to mount the folder from the
WebServer root, although future versions of iTools may have this
from your hard drive root.
Tenon Tech Support