
|
|
|

iCal and iTools 7 WebDAV tutorial
iCal is an elegant personal calendar application that helps you manage your life and your time better than ever before. Essentially, iCal is an organizer that offers multiple calendars, all of which can be integrated so you do not leave for your annual business trip to Outer Mongolia on the same day as your wedding anniversary, when you should be buying flowers and dinner for your wife.
If you already have your own iTools 7 server, it may seem redundant and expensive to get a .Mac account for set up your own iCal Calendars. What can you do?
The easiest option is to just export the calendar to an .ics and put that up on a web site. However, with this method, it is a lot of work to update your calendar. iCal has a feature that allows you to update calendars automatically through a protocol called WebDAV. You just select the menu Calendar -> update, and in a few second the published calendar is up-to-date.
Here are the steps for setting up iCal:
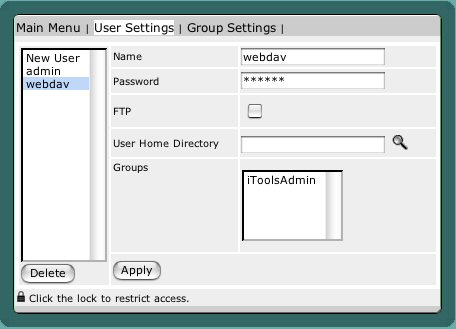
1. Create an iTools 7 user.
iTools needs to know if the iCal user trying to update the calendar is legitimate. So you have to create a new user and password in Users Settings. Simply, fill in a username and password, then click Apply.
2. Set up directories.
If you want to create a subdirectory called /dav, then go to your server's document root (it's usually /Library/Tenon/WebServer/Documents) and create a new directory. We'll call this directory dav. Choose a name that will help you remember what the directory is for.
Set the permissions and ownership of this directory so that the Web server can write to it. Do this by changing the group owner to www, the group the Web server belongs to:
sudo chgrp www /Library/Tenon/WebServer/Documents/dav
sudo chmod 775 /Library/Tenon/WebServer/Documents/dav
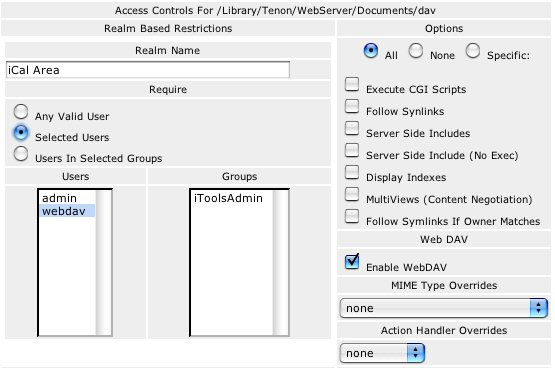
3. Enable Access Control folder.
Next, click on Web Settings -> Access Control in iTools Administration server. Click browse to select /Library/Tenon/WebServer/Documents/dav from the file browser. Enable the WebDAV checkbox, input the "Realm Name" of your choice, and select the username that you created in step 1, then click Apply.
4. Publish your calendar.
Select the calendar you want to publish and then hit the menu command Calendar -> publish...The window that pops up will give you two options: publish on .Mac or on a Web server. Being a iTools 7 user, you will click on the second, which expands the window with more options.
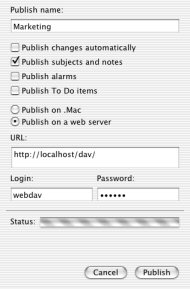
For the URL, put the full path to the calendar file on the server. The name of the file may not be exactly what you typed in for the calendar. If there are spaces, for example, they will be replaced with %20. You can see ahead of time what the name will be by exporting the database to a file and reading the filename.
For username, put in the username and the password you created back in step 1. And that's it!
You can create as many calendars as you want.
Test it out. You can subscribe to your own calendars, though you may think you're seeing double. If you have problems, check the Web server's error log in /Library/Tenon/WebServer/Logs/error_log. When you're done, you'll be able to tell your friends and associates how to subscribe to your calendars and feel the respect wash over you.
| Tenon Home | Products | Order | Contact Us | About Tenon | Register | Tech Support | Resources | Press Room | Mailing Lists |

|
Copyright©2013 Tenon Intersystems, 232 Anacapa Street, Suite 2A, Santa Barbara,
CA 93101. All rights reserved. |