[ Table of Contents ] [ Previous Chapter ] [ Next Chapter ] [ Index ]

Logs

Web Ten can be configured to have either Apache or Squid do its logging. When using Apache, Web Ten for Mac OS supports two logging formats: The CLF (Common Log Format), which also includes the Extended Log Format. When Web Ten uses the Squid cache, Squid does all the logging in CLF (Common Log Format). The advantage to using Squid cache is that server performance will improve (since Squid caches content in memory), but the log format capabilities are much less flexible than when Apache is used to log. If the Squid cache is on, the Squid cache accelerator will be responsible for logging activity. If caching is off, Apache is responsible for keeping logs of activity. The Logs section is divided into sections describing these two possibilities.


13.1 Apache Logging


The Apache-based logging is controlled via the Administration Server (http://servername/webten_admin). If you decide to use Apache logging you must start by turning off the Squid cache (see section See Cache Settings).


To set a custom Log file for each virtual host, use the TransferLog setting of the Virtual Host Config page (see section See TransferLog) or use the TransferLog setting in the Server Defaults (see section See TransferLog) to set a log file for all site activity. If there is not a file set as the TransferLog , Apache will only log to the disk if the Display Access Log window is opened.


A LogFormat must also be set for the TransferLog file to be used (see section See LogFormat). The standard WebSTAR Log format or the default standard CLF (Common Log Format) can be automatically entered into this field. In the LogFormat value field, you can also set a unique format rather than using one of the standard formats (note that if you use the toggle switch, then the Admin Server will replace any custom format symbols inserted with one of the standard configurations.)


To create a custom format, enter a combination of format symbols into the LogFormat field. For example, "%h %l %u %t %r %b" would be a functional format setting (don't forget the quotation marks). The subsections that follow describe some possible Apache log formats and the log format element symbols.


13.1.1 Log File Format Symbol Definitions


%W (Log records in Webstar format)

%h (The hostname of the client, (or IP number if hostname is not available or if

DNSLookup is off.))

%u (remote user from authorization, if any.)

%t (date and time in CLF format: (day/month/year:hour:minute:second zone.))

%r (first line of request exactly as it came from the client (i.e., the file

name, and protocol requested.))

%s (original http request status code returned to client before internal

redirection. Indicates where or not the file was successfully retrieved,

and if not, what error message was returned.)

%>s (final http request status code.)

%b (number of bytes sent, not including headers.)

%U (url path requested)

%T (transfer time or time taken to serve a request in seconds)

%p (TCP port of the server servicing the request)

%P (process ID of the server servicing the request)

%l (the clients remote logname, if supplied)

%v (name of (virtual) server servicing request)

%w (WebSTAR result, i.e. "OK", "ERR", or "PRIV")

%d (date and time in WebSTAR format)

%{}n (contents of note from another module in brackets)

%{}i (Input header item in brackets)

%{}o (output header item)

%{Referer}i (The URL the client was on before requesting your URL.

%{User-agent}i (The identity of the client software (browser.))


13.1.1.1 Some Configuration Examples:


Standard WebSTAR Format

DATE TIME RESULT HOSTNAME URL BYTES_SENT


"%W %d %w %h %>U %b"


Standard Common Log Format (CLF) (Default)

HOSTNAME LOGINNAME USER GMT_TIME "REQUEST" STATUS BYTES_SENT


"%h %l %u %t \"%r\" %>s %b"


WebSTAR Custom Format Example

HOSTNAME USER_AGENT USER GMT_TIME 'REQUEST' RESULT STATUS BYTES_SENT


"%W %h %{User-Agent}i %>u %t '%r' %w %>s %b"

13.2 Squid Logging

When the cache is enabled, Squid does all caching for the web server. When Squid is enabled, the directive "CacheTransferLog" in the httpd.conf file specifies the TransferLog file. When Squid is disabled, Apache takes responsibility for logging and uses the TransferLog directive with the Transfer log file specified in the Administration server. The default Squid log format is:

Client Ident - [Timestamp1] "Method URI" Type Sizes

This logging configuration can not be changed, but you can add HTTP Header Fields. Near the end of the squid.conf file, you will notice the lines:


# TAG: log_http_hdrs

# Append individual HTTP request headers to CLF log entry


#log_http_hdrs Referer User-Agent


The last line is an example implementing the most popular HTTP Header Fields, Referer and User-Agent. Using the same format, you can add any Header Field you want. Or you can remove the # on the last line and log these example Header Fields.

13.2.1 Squid Log Rolling and Splitting

13.2.1.1 Log Splitting


A common task that web administrators need to accomplish is to split up the logs into separate files so that they can be either processed by a program such as Funnel Web Pro, and/or placed into the virtual host folders so that virtual-host site administrators can view the log files.


There is also a log splitting script to split Squid generated logs which is included on the Web Ten CD ROM. This script archives the main WebTen.log file and splits it into separate files for each virtual host. Installing the script involves simply following the instructions given in the readme file that accompanies the script (which includes editing the crontab file for automatic log rolling).


13.2.1.2 Log Rolling


This log rolling method uses Squid's internal log rolling features to roll the logs. This may be more convenient if you do not want your logs split up into your separate virtual hosts. The first step involves editing the squid.conf file that resides in the tenon:squid:etc folder in the WebTen folder.


Under the "LOGFILE PATHNAMES AND CACHE DIRECTORIES" section in the squid.conf file, change "cache_access_log" to the directory and the name you want your logs to be. Example: We have two servers, so for Web01 we do "cache_access_log /usr/local/apache/web01_apache.log".


Under the "MISCELLANEOUS" section in the squid.conf file, change "logfile_rotate" to the number of log files you want to rotate through. If you want to rotate through a weeks worth of logs, then it would be "logfile_rotate 10".


You'll need to create a cron (see chapter See Clock Service (Cron)) job to tell Squid to rotate it's logs when you want it to. Cron executes programs, scripts, etc., at intervals you specify (Seconds, Minutes, Days, Weeks, Month, etc.)


Add the following line to your crontab file:


0 0 * * * /usr/local/squid/bin/squid -k rotate


cron will execute the "squid -k rotate" command at zero hour (midnight) to run Squid with the command line argument "-k rotate". Squid will close the current log, rename it with a ".#" at the end, and then create a new log file. Each successive day the log files are rotate and given a higher number.


Example: If our log file is named "podunk_apache.log", then at midnight Squid would rotate this to "podunk_apache.log.0". The next day the ".0" log file would be renamed with a ".1" at the end, and the current ".log" file would be renamed ".log.0". Your most current rotated log file will always have ".0" at the end.


Using CGIs

In general, when traversing a Web page, clicking on a link causes that client (browser) to send a message to the server (the site maintaining the Web page the client wishes to view) with a given URL. The server gets the file indicated by the URL and sends the contents of the file back to the browser to be displayed to the user. The Common Gateway Interface (CGI) is a mechanism that causes the server to behave differently.


The CGI protocol defines communication between the server and an external program. When the URL points to a CGI script file, instead of simply sending the contents of the file to the browser, the server executes the script and then returns the program output to the browser. This allows Webmasters to create dynamic documents and interactive pages.


14.1 Shell CGIs

A shell CGI is a text file that contains commands for the Bourne Shell or C Shell command interpreter. Any text editor can be used to create shell CGIs. The resultant file will typically have the file extension of " .sh " (e.g., mycgi.sh ). Place the file in the Web Ten cgi-bin folder.


The simplest CGI to create and use -- the shell CGI -- is a text file that contains commands for the Bourne Shell command interpreter. The steps are as follows:


Create a CGI called mycgi.sh. Store the newly created file in the cgi-bin directory. The new CGI can be referenced from a browser with the following URL: /cgi-bin/<cgi-name>. If mycgi.sh is stored in the cgi-bin directory, the URL would be: /cgi-bin/mycgi.sh.


Basic Steps


14.1.1 Required Shell Script Content

In addition to creating the text file, there are a few important considerations with respect to the content of the file. First, the top line of the file must contain the following text:


#!/bin/sh


This tells the system that this is a Bourne Shell script and that the Bourne Shell should be used to interpret the rest of the script.


Second, you can use the echo command to generate text which will be returned to the browser that initiated the URL. The first echo command must contain the following Bourne Shell commands to generate HTTP. This puts Web Ten and the browser in the proper mode to accept everything else:


echo Content-type: text/plain

echo


The first echo indicates that text/plain will follow. The second echo is necessary in order to get the HTTP interpreter to accept the Content-type request. After that, any text sent with an echo command is printed on the originating browser's screen as a response to the URL request.


Shell scripts are text files containing Bourne Shell commands that can generate a stream of characters in response to being executed. There are Bourne Shell commands for assigning integer and string values to shell variables, commands for prescribing conditional flow through the shell script, and commands for running other programs. Relatively sophisticated CGIs can be created by combining different Bourne Shell commands. There are a number of widely available books describing Bourne Shell programming.


Bourne Shell CGIs are used for low-performance, easy-to-develop CGIs. Each Bourne Shell script is text, and is interpreted by a Bourne Shell interpreter controlled by Web Ten . Since the interpreter interprets each command, shell scripts operate fairly slowly and use a large number of processing cycles. Therefore, Bourne Shell scripts should be used primarily for rapid CGI development or CGI prototyping. If a CGI will be used in high volume, you may want to consider constructing a more efficient C Language CGI or a Perl CGI.

14.1.2 Printenv.sh Example


A sample shell CGI is included in the printenv.sh file located in the Web Ten cgi-bin directory. The first few lines of the file establish the mandatory #!/bin/sh and echo Content-type: text/plain requirements for any shell script. The remaining shell script commands are used to output a few lines of constant text, followed by a dozen or more lines that output the values of a family of shell variables. The following is the content of the printenv.sh CGI:


#!/bin/sh

# disable filename globbing

set -f

echo Content-type: text/plain

echo

echo CGI/1.0 test script report:

echo

echo argc is $#. argv is "$*".

echo

echo SERVER_SOFTWARE = $SERVER_SOFTWARE

echo SERVER_NAME = $SERVER_NAME

echo GATEWAY_INTERFACE = $GATEWAY_INTERFACE

echo SERVER_PROTOCOL = $SERVER_PROTOCOL

echo SERVER_PORT = $SERVER_PORT

echo REQUEST_METHOD = $REQUEST_METHOD

echo HTTP_ACCEPT = "$HTTP_ACCEPT"

echo PATH_INFO = "$PATH_INFO"

echo PATH_TRANSLATED = "$PATH_TRANSLATED"


echo QUERY_STRING = $QUERY_STRING


echo SCRIPT_NAME = $SCRIPT_NAME

echo REMOTE_HOST = $REMOTE_HOST

echo REMOTE_ADDR = $REMOTE_ADDR

echo REMOTE_USER = $REMOTE_USER

echo AUTH_TYPE = $AUTH_TYPE

echo CONTENT_TYPE = $CONTENT_TYPE

echo CONTENT_LENGTH = $CONTENT_LENGTH


When the printenv.sh CGI is referenced by a URL, it produces the following output:


CGI/1.0 test script report:


argc is 0. argv is .


SERVER_SOFTWARE = Apache/1.2.6.36 WebTen/3.0

SERVER_NAME = www.tenon.com

GATEWAY_INTERFACE = CGI/1.1

SERVER_PROTOCOL = HTTP/1.0

SERVER_PORT = 80

REQUEST_METHOD = GET

HTTP_ACCEPT = image/gif, image/x-xbitmap, image/jpeg, image/pjpeg, image/png, */*

PATH_INFO =

PATH_TRANSLATED =

SCRIPT_NAME = /cgi-bin/printenv.sh

QUERY_STRING =

REMOTE_HOST = 192.83.246.60

REMOTE_ADDR = 192.83.246.60

REMOTE_USER =

AUTH_TYPE =

CONTENT_TYPE =

CONTENT_LENGTH =


14.1.3 Shell Variables


Shell variables are pre-defined values set by Web Ten before the shell CGI is started. Shell variables are referenced by placing a "$" character in front of the

name of the shell variable. If the shell interpreter finds a name that matches the string of characters following any "$" character, it substitutes the value of that

variable in its processing. In the case of the echo command, the value of the $VAR shell variable is substituted as a parameter to the echo command and is

output to the browser as a partial response to the URL request.


14.2 Perl CGIs

A Perl CGI is a text file that contains commands for the Perl language interpreter. The file name extension is usually " .pl ", and the file is placed in the cgi-bin folder. A Perl interpreter is included with Web Ten , so Web Ten is able to interpret Perl scripts.


This document describes Web Ten Perl CGIs. A Perl CGI is a text file that contains commands for the Perl language interpreter.


Create a new CGI called mycgi.pl.


Store the newly created file in the cgi-bin directory, under the Web Ten cgi-bin directory. The new CGI can be referenced from a browser with the following URL: /cgi-bin/<cgi-name>.

14.2.1 Required Script Content


In addition to creating the text file, there are a few important considerations with respect to the content of the file. First, the top line of the file must contain the text:


#!/usr/bin/perl


This tells the Web Ten system that this is a Perl script and that Perl should be used to process the remainder of the file.


Second, you can use Perl print statements to generate text which will be returned to the browser that initiated the URL. The first print command must contain an HTTP header. This header indicates what format or kind of data will be output by the remainder of the print commands. The choices are usually plain text or text that is marked up using the HyperText Markup Language (HTML). This first print command puts Web Ten and the browser in the proper mode to accept everything else.


For Perl scripts that output plain text, use:


print "Content-type: text/plain \n\n";


For Perl scripts that output HTML statements, use:


print "Content-type: text/html \n\n";


The print indicates that text/plain or text/html will follow. After that, any text generated with a print command is sent to the originating browser as a response to the URL request.


Perl scripts are text files containing Perl language statements that generate a stream of text characters in response to being executed. There are Perl statements for assigning integer and string values to variables, statements for prescribing conditional flow through the script, and statements for running other programs. Very sophisticated CGIs can be created by combining different Perl statements. A number of widely available books describing Perl programming are available.


Programming Perl, Second Edition by Larry Wall, Tom Christiansen and Randal L. Schwartz, with Stephen Potter. 1996, O'Reilly & Associates


Perl is used for medium-performance, easy-to-develop CGIs. Each Perl program is text. The scripts are interpreted by a Perl interpreter controlled by Web Ten . Since the interpreter interprets each Perl statement, Perl scripts can consume a lot of memory and use a large number of processing cycles.


14.2.2 Printenv.pl Example


A sample Perl CGI is included in the .printenv.pl file located in the Web Ten cgi-bin directory. The first few lines of the file establish the mandatory #!/usr/bin/perl and print Content-type: text/plain requirements for any Perl script. The remaining two Perl statements output a dozen or more lines that contain the values of a family of environment variables. The following is the content of the printenv.pl CGI:


#!/usr/bin/perl


print "Content-type: text/html\n\n";

while( ($key,$val) = each %ENV ) { print "$key = $val<BR>\n"; }


When the printenv.pl CGI is referenced by a URL, it produces the following output:


SERVER_SOFTWARE = Apache/1.2.6.36 WebTen/3.0

GATEWAY_INTERFACE = CGI/1.1

DOCUMENT_ROOT = /usr/local/etc/httpd/WebSites/www.tenon.com

REMOTE_ADDR = 192.83.246.60

APACHE_PORT = 81

SERVER_PROTOCOL = HTTP/1.0

REQUEST_METHOD = GET

REMOTE_HOST = 192.83.246.60

QUERY_STRING =

HTTP_USER_AGENT = Mozilla/4.61 (Macintosh; I; PPC)

ADMIN_PORT = 84

PATH = /bin:/usr/bin:/usr/ucb:/usr/bsd:/usr/local/bin

HTTP_ACCEPT = image/gif, image/x-xbitmap, image/jpeg, image/pjpeg, image/png, */*

REMOTE_PORT = 1138

HTTP_ACCEPT_LANGUAGE = en,pdf

HTTP_CACHE_CONTROL = Max-age=259200

SCRIPT_NAME = /cgi-bin/printenv.pl

SCRIPT_FILENAME = /usr/local/etc/httpd/cgi-bin/printenv.pl

HTTP_ACCEPT_ENCODING = gzip

SERVER_NAME = www.tenon.com

REQUEST_URI = /cgi-bin/printenv.pl

HTTP_ACCEPT_CHARSET = iso-8859-1,*,utf-8

HTTP_X_FORWARDED_FOR = 192.83.246.60

SERVER_PORT = 80

HTTP_HOST = www.tenon.com

SERVER_ADMIN = webmaster@tenon.com

HTTP_VIA = 1.0 www.tenon.com:80 (Squid/1.1.20.6)

14.2.3 Environment Variables


Environment variables are pre-defined values set by Web Ten before the Perl CGI is started. Environment variables are referenced by the Perl statement $ENV{<env var>}. The Perl statement:


$ENV{PATH} = "/bin:/usr/bin";


sets the PATH environment variable. The Perl statement:


print $ENV{PATH};


prints the current value of the PATH environment variable.


14.3 C Language CGIs

A C language CGI is a computer program. To produce a C language CGI, you need to write the C language source program using any text editor. Then, a C language translator called a C compiler is needed to translate the C program into machine language. The machine language file with the extension " .c " is stored in the cgi-bin folder in a file that can be executed by Web Ten .


A C Language CGI is a computer program. To produce a C Language CGI you must first write the C Language source code using a text editor program. Once the program is written, a C Language translator, called a C compiler, is used to translate the C Language into machine language.


Create a new CGI called mycgi.c. Once the C Language source file is constructed, invoke the C Language compiler using the following format:


cc -O -o mycgi mycgi.c


This command produces a machine language file named mycgi using the C Language source found in the file mycgi.c. The resulting machine language file or objectfile is directly executable under Web Ten . You can use debugging techniques to ensure that the C Language CGI operates correctly. Once the CGI is complete, store the CGI in the Web Ten cgi-bin directory. Then reference the CGI with the following URL: /cgi-bin/mycgi


The CGI will be invoked by Web Ten and the output will be transported to your browser.


Basic Steps

C Language CGIs are used for high-performance CGIs since each C Language CGI is a compiled program.

14.3.1 Printenv.c Example

The C Language CGI example included with Web Ten is in a file named printenv.c, which is located in the Web Ten cgi-bin directory.The printenv source code is in tenon/examples/printenv.c.text. Note that this code will not compile and run. It is only listed as an example of how to write C language CGIs. Below is the content of the printenv.c CGI:


#include <stdio.h>

#include <stdlib.h>

typedef struct {

char name[128];

char val[128];

} entry;

void getword(char *word, char *line, char stop);

char x2c(char *what);

void unescape_url(char *url);

void plustospace(char *str);


entry entries[10000];


main(int argc, char *argv[]) {

register int x,m=0;

char *cl;


printf("Content-type: text/html%c%c",10,10);


if(strcmp(getenv("REQUEST_METHOD"),"GET")) {

printf("This script should be referenced with a METHOD of GET.\n");

printf("If you don't understand this, see this ");

printf("<A HREF=\"http://www.ncsa.uiuc.edu/SDG/Software/Mosaic/Docs/fill-out-forms/overview.html\">forms

overview</A>.%c",10);

exit(1);

}


cl = getenv("QUERY_STRING");

if(cl == NULL) {

printf("No query information to decode.\n");

exit(1);

}

for(x=0;cl[0] != '\0';x++) {

m=x;

getword(entries[x].val,cl,'&');

plustospace(entries[x].val);

unescape_url(entries[x].val);

getword(entries[x].name,entries[x].val,'=');

}


printf("<H1>Query Results</H1>");

printf("You submitted the following name/value pairs:<p>%c",10);

printf("<ul>%c",10);


for(x=0; x <= m; x++)

printf("<li> <code>%s = %s</code>%c", entries[x].name, entries[x].val,10);

printf("</ul>%c",10);

}


This CGI prints the name/value parameter pairs that are available to any CGI when the CGI is invoked. The general flow of the printenv CGI is that it uses the printf statement to output Content-type: text/html\n\n. This is needed in order for the CGI to inform Web Ten and the remote browser of the type of content to follow.


The program then verifies whether or not a GET type of HTTP request was used to initiate the CGI. If a GET request was not used, an error message is returned with several printf statements and the program exits. If a GET HTTP request is found, the environment variable QUERY_STRING is requested. If that string is unavailable, an error message is printed and the program exits. If QUERY_STRING is found, a for loop is entered. The for loop calls the getword subroutine to parse the string into name and value pairs. Once all of the parameters have been parsed, the printf subroutine is called several times to output a constant string "QUERY RESULTS", followed by the string "You submitted the following name/value pairs:", followed by a name and value pair on each line until all of the name/value parameters have been displayed. When the printenv CGI is referenced by the URL:


/cgi-bin/printenv?company=Tenon Intersystems&addr=1123 Chapala St.&city=Santa Barbara


it produces the following output:


Query Results

You submitted the following name/value pairs:

company = Tenon Intersystems

addr = 1123 Chapala St.

city = Santa Barbara


14.4 Fast CGI

Web Ten includes built-in support for the execution of FastCGI scripts. FastCGI scripts are faster than normal CGI scripts because they are always running, whereas normal CGIs are re-loaded each time they are run. Any CGI can take advantage of FastCGI capabilities if the script's code is modified. Below is an example of the simple printenv.pl script in the form of a FastCGI. The "use CGI::Fast;" line makes the FastCGI capabilities available to the script. The "while" loop must contain the CGI's code. The "$query" variable will change every time the CGI is used by a client and therefore can be used to track which request is being processed.


#!/usr/bin/perl

use CGI::Fast;
while ($query = new CGI::Fast)
{
print "Content-type: text/html<BR>\n";
while (($key, $val) = each %ENV) {
print "$key = $val<BR>\n";
}
}


When a FastCGI such as this is run the first time, mod_fastcgi (an Apache module) spawns a process that keeps the script running while Apache is running. To have the FastCGI run automatically when Apache is first started, put the following lines in Web Ten 's httpd.conf file:


<IfModule mod_fastcgi.c>

FastCGIServer /usr/local/apache/cgi-bin/printenv.fcgi -processes 1

</IfModule>


These lines will create one instance of the printenv.fcgi script whenever Apache is run. The number of processes can be increased if more instances are needed to accommodate the volume of requests. All FastCGI scripts are named with the ".fcgi" extension by convention. Be sure to set the correct path to the FastCGI script in the Apache directives (/usr/local/apache/ is the path to the Web Ten folder.)


WEBmail

WEBmail is both an e-mail client and an e-mail server. Used with Web Ten , it provides an interface to create and utilize e-mail mailboxes. This dual nature makes WEBmail a one-stop e-mail solution since it is both a self-contained server and client. WEBmail comes pre-configured with a full Web Ten installation or it can be installed separately.


With WEBmail installed, all that has to be done to get a working mail server is create new mailboxes. You can access the WEBmail account creation pages by the URL


http://host.yourdomain.com/webmail_adduser.


To immediately use WEBmail as a client, the login page is:


http://host.yourdomain.com/webmail

Note that to use WEBmail as a server, "mail" must be enabled in the Web Ten Preferences. See section See Preferences for more information about the Web Ten preferences. Enabling the e-mail server significantly increases memory usage .

15.1 Using WEBmail as an e-mail Client

WEBmail is pre-configured to be a convenient e-mail client application. Using WEBmail as a client is as easy as loading the page


http://host.yourdomain.com/webmail


and entering your full e-mail address and password in the fields provided (see picture below).


The e-mail address entered must be fully qualified (e.g. joe@mail.tenon.com) as opposed to joe@tenon.com.)
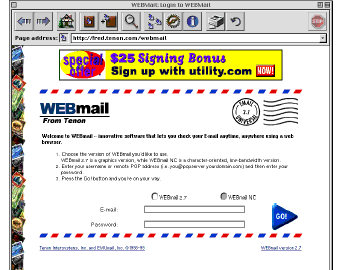
 

Figure 72: WEBmail Login


When logging in, you must be sure to use your full e-mail address. For example, the address "user@domain.com" is not a full e-mail address (though you may receive mail at that address.) WEBmail requires that you include the hostname in your e-mail login so it can properly communicate with your mail server. A "fully qualified" e-mail address, four example, would be "user@mail.domain.com". You e-mail password is the same password you use to log into your e-mail account in any other mail client. Choose "GO" to log into WEBmail once you have entered your e-mail address and password.


Once successfully logged in, you will see a list of your e-mail messages. WEbmail is designed to offer all the features of an e-mail client. For help using the e-mail client portion of WEBmail, refer to the WEBmail documentation at "http://host.domain.com/web_mail/help/".

15.2 Adding a WEBmail mailbox


WEBmail includes an easy to follow web-based interface for creating accounts. The account creation process can be left up to the mailbox user thus minimizing monotonous administration. The WEBmail account setup process is outlined below and can be accessed on your Web Ten web server from the URL http://host.yourdomain.com/webmail_adduser (Note that this form is initially restricted to the webmaster and will ask for a user name and password.)
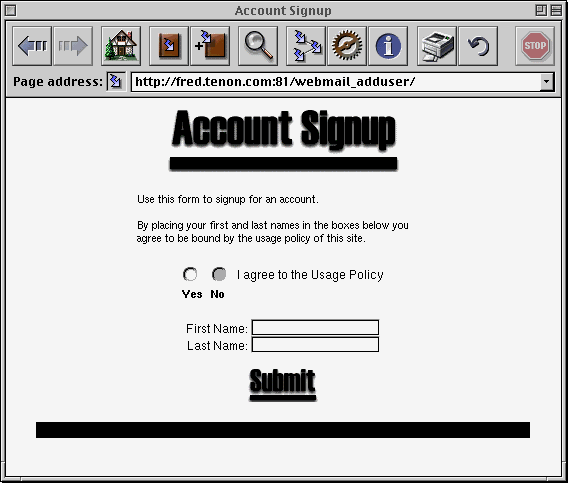


This is the first screen you see when creating a new WEBmail mailbox. Simply enter your name and choose "Submit." This is not the name that will be attached to the account, but a record that you agreed to the usage policy.
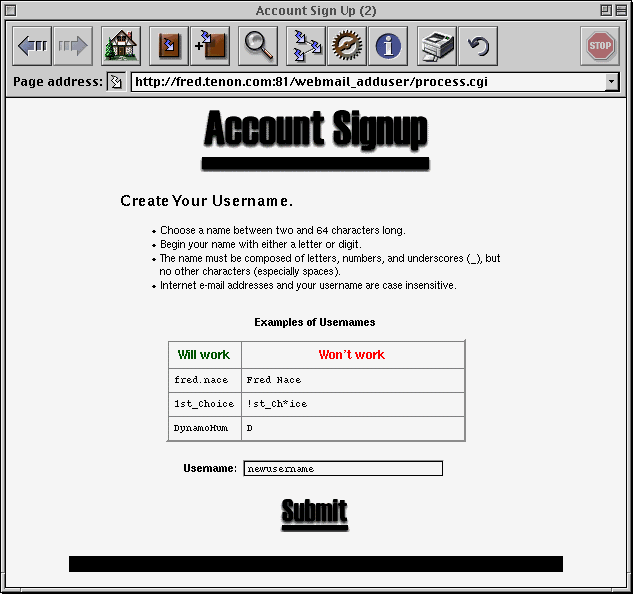


The next form will ask you what your mailbox login is to be. This will determine your e-mail address (e.g. newuser@domain.com).
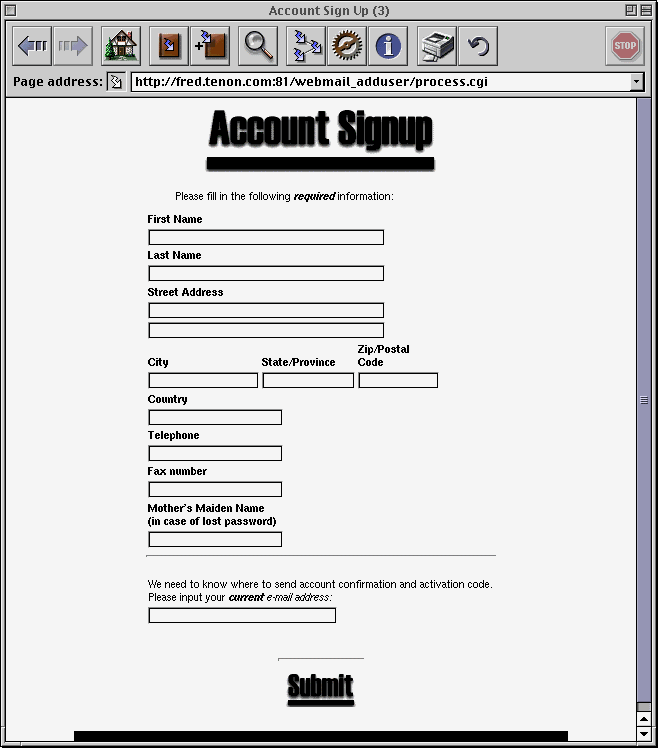


After submitting your mailbox login, you will be asked for your personal information. None of it is required for the form to submit properly, but you must enter a valid e-mail address in the last field so that WEBmail can send confirmation e-mail. The confirmation e-mail must be replied to in order for the account to become active.
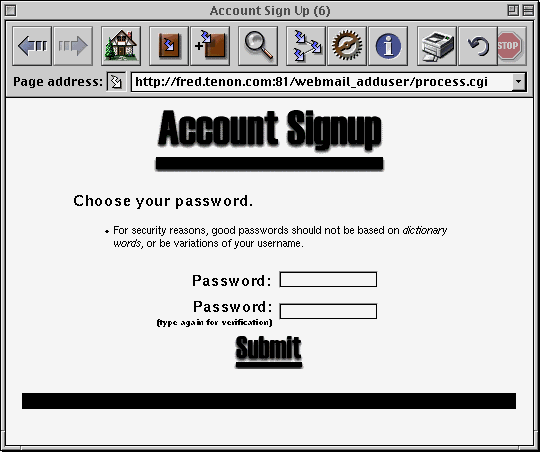
 

Figure 73: Choose WEBmail account password


The final step is entering a password for the new mailbox. Enter it twice and choose "Submit." WEBmail will reply with a message that confirms the account has been successfully created.


15.3 Customizing WEBmail

WEBmail can be customized to allow either user editable WEBmail client and adduser pages or WEBmail pages with no advertisements. These options must be purchased separately from Web Ten . For more information, see http://www.tenon.com/products/webmail or send an inquiry to sales@tenon.com.
 

ht://Dig

The version of ht://Dig included in Web Ten has been extended with a CGI interface that supports the administrative tasks of creating and maintaining searchable databases in a fully integrated, multiple virtual host Web Ten package.


ht://Dig is a very customizable utility. The Web Ten indexing CGI is designed as an easy to use front-end to htdig. It provides a quick way to get a basic set of htdig's search capabilities working for each virtual host in a Web Ten system. To further exploit the power of htdig, refer to the ht://Dig documentation (http://host.domain.com/htdig/doc/index.html). Note that the htdig configuration files created by the indexing CGI are stored in the /htdig/conf/<virtualhostname>.conf file for each virtual host.


You will probably want to customize the HTML search page and the results page from the defaults that are provided. Look in the ht://Dig documentation (http://host.domain.com/htdig/doc/index.html) for a description of the files that it uses for each page. Also look in the WebTen/tenon/apache/conf/httpd.conf file for the extra htdig configuration lines that were added by the Web Ten Search Engine Installer. You might want to change these directives if, for example, you wanted to change the URLs for users to access the search engine for a particular virtual host or for your entire Web Server.


Once a searchable database has been built, it may be necessary to periodically rebuild the database to include new or changed pages that have been added to a site. To facilitate periodic updates, the indexing CGI can also be run as a CRON script.


The indexing process can create large database files. Almost every word that is retrieved from examining a document is stored into a sorted database file for later searching. This means that a lot of disk space may be required to successfully complete an indexing operation. A large site might require as much as 300 Mbytes of available disk space!


16.1 Build the Web Ten Search Engine Index File


The Web Ten Search Engine Index files are built and maintained using a special indexing CGI. This CGI is intended only for Web Ten Administrators and it is protected within the Web Ten Admin realm (username and password are required). Use the following URL to open the indexing CGI.


Substitute your Web Ten servers name into: http://hostname/index.cgi


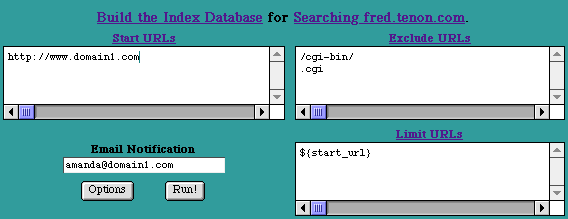
The indexing CGI displays a form with a fields for entering the URLs to be indexed, excluded and limited and an optional email address.


Figure 74: Default Indexing Options


The indexing form contains fields for specifying which URLs should be indexed. The Start URLs are the starting point for the indexing engine. The Exclude URLs are URLs that should not be indexed. The Limit URLs contains sets of patterns that the URLs must match.


The default Start URLs is a single URL matching the virtual host name used in the request. This default instructs the indexing process to visit all of the documents on this virtual host that are reachable (following any numbers of links) from the home page. The default Limit URLs specifies a set that exactly matches the set of Start URLs. In most cases, this is all that is needed to build a complete index of an entire virtual host. Additional URLs can be added to these lists.


The form also provides a field for an email address. It an email address is provided, the results of the indexing process will be emailed to that address.


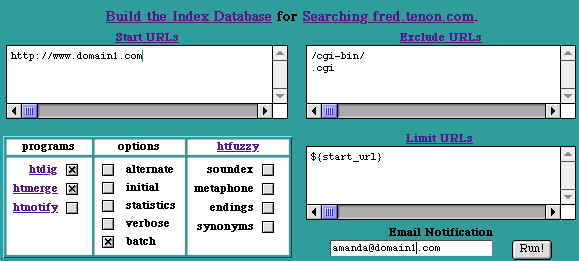
Additional options may be displayed by clicking on the Options button. In this case, the form is displayed again with the default options shown (below). These defaults can then be modified. (The default options are used if the form is submitted without displaying the options.) The default settings are sufficient to create a search engine index (or database) file for the specified URLs.


Figure 75: All Indexing Options


To begin the indexing process, click on the Run! button. The CGI will start a batch indexing process (if the batch options is specified) that continues to run after the CGI has completed. A link to a file which will contain the detailed results of the indexing process is provided. Note that it may take some time for the batch indexing process to complete. (For example, a default Web Ten installation takes about 10 minutes.) If

the results are referenced before the indexing process is complete, only the completed parts of the indexing process will be shown. Providing an email address is the best way to be notified when the entire indexing operation is complete.


To continually monitor the progress of the indexing process, uncheck the batch option before clicking on the Run! button. In this case, the output from the indexing process is continually displayed in the CGIs output and the CGI does not complete until the indexing process completes.


16.2 Test the Web Ten Search Engine Database

The best way to test the searchable database is to perform some actual searches. Use the following URL to search for a particular topic on the indexed site:


Substitute your Web Ten servers name into


http:/host.domain.com/search.html


16.3 Multiple Virtual Hosts


The Web Ten Search Engine supports indexing and searching for multiple virtual hosts. By default, searchable databases are built on a per virtual host basis. For example, to build the index files for virtual hosts www.domain1.com and www.domain2.com, use the following URLs:


http://www.domain1.com/index.cgi

http://www.domain2.com/index.cgi


To search the databases for these virtual hosts, use the following corresponding URLs:


http://www.domain1.com/search.html

http://www.domain2.com/search.html


Plug-ins and Apache Modules

plug-ins and Apache Modules add extra functionality to the Wen Ten server package. Web Ten is compatible with both dynamically loadable Apache Modules and WebStar-style plug-ins.

Figure 76: Apache Modules and plug-ins

17.1 Plug-ins

Plug-ins must be installed in the plug-ins folder. Carefully read and follow the installation instructions provided with your plug-in to install any other files delivered with the plug-in, and to configure the plug-in for your server. Web Ten must be restarted to activate (or deactivate) any newly installed (or un-installed) plug-ins. Use the Restart Server button in the Server Controls page, or quit and restart Web Ten whenever any plug-in installations are completed.

17.1.1 Installing Plug-ins

  • Install according to the instructions included with the plug-in package.
  • Re-start Web Ten , log into the Web Ten admin server and make sure the plug-in has registered (see section See Plug-In Administration for information) and note the "Action" and "Suffix" entries in the plug-in Administration table.
  • Configure an Action Handler for the plug-in with the Action that the plug-in reported in the plug-in Administration table (see See Configuring Plug-In Actions)
  • Configure a MIME Extension for the plug-in with the extension reported in the plug-in Administration table (see See Configuring Plug-In Actions)
  • Test the plug-in with the content provided with the plug-in package.

17.2 Apache Modules

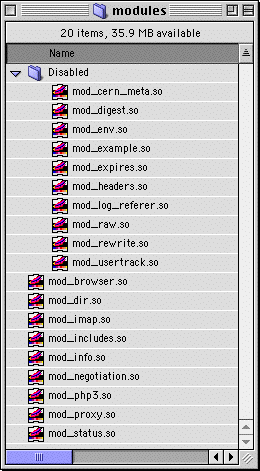
Apache modules are the equivalent of WebSTAR plug-ins. Web Ten includes many Apache modules and, in most cases, those modules can be configured via the Web Ten Administration Server. The Apache Modules included are shown below.


Figure 77: Included Apache Modules


In many cases, an Apache module provides the full functionality of a common WebSTAR-style plug-in.

17.2.1 Installing Apache Modules

To install an Apache Module, put the module file in the WebTen/Modules folder and re-start Web Ten . Then, if the module requires a MIME Extersion and an Action Handler, configure these as they would be configured for a plug-in (see See Installing Plug-ins). Every Apache Module should include documentation that defines the module's requirements.


[ Table of Contents ] [ Previous Chapter ] [ Next Chapter ] [ Index ]