Domain Name System (DNS)
The Domain Name System (DNS) service acts very much like a telephone company directory assistance service. It provides mapping between Internet "host" computer names and Internet addresses. Given a host name, it will look up and return a host address. Sophisticated DNS features include the mapping of several different names to a single Internet address and the mapping of several different Internet addresses to a single host name.
The Domain Name System itself is a distributed database of domain names and Internet addresses. DNS translates names (for example, panther.wildcats.com) to IP addresses (for example, 205.1.2.3) and vice versa. A client/server scheme, supported by replication and caching, enables these mappings to be available throughout the Internet. The best resource for an in-depth understanding of DNS is "DNS and BIND", published by O'Reilly & Associates, Inc. Domain name servers make up the server half of the client/server mechanism. Name servers contain information about some segment of the DNS database and make that information available to clients, called resolvers. Web Ten includes a domain name server.
Having a domain name server properly configured with the name and IP address of your Web Ten system greatly facilitates the configuration and use of Web Ten . However, if your domain name server has not been configured with the name and address of your Web Ten system, you can still configure and use Web Ten . When the domain name server is later configured with information about your Web Ten system, Web Ten will continue to operate properly, and can easily be re-configured to exploit the advantages of DNS.
Web Ten includes a complete implementation of the Berkeley Internet Named Domain (BIND) DNS, version 8. BIND, version 8, is the latest incarnation of what is considered the definitive implementation of the DNS protocol. The software is maintained and continually enhanced by the Internet Software Consortium (www.isc.org). This latest version includes significant enhancements, including performance improvements and security-related fixes BIND under Web Ten functions independently of Apache, and has been designed to either totally replace or operate in concert with other DNS servers for your domains.
You enable BIND under Web Ten by checking the "Enable DNS" box in the Web Ten Preferences.
Further configuration of Web Ten 's Preferences are affected by your decision to enable BIND under Web Ten , or by the presence (with proper configuration) or absence of a remote DNS server. Also, how Web Ten handles specific features of IP address-based or name-based virtual hosts is affected as well. These related topics are both discussed below.
Virtual Hosting Requirements
 IP-based virtual hosts use the actual IP address of each virtual host. They are also known as IP address-based virtual hosts. Name-based virtual hosts use the DNS served name for each virtual host. They are also known as host header-based virtual hosts.
Web Ten Preferences and DNS
 If using you are using OpenTransport, Web
Ten
's IP address is obtained from the TCP/IP control panel. If you chose to replace OpenTransport, Web
Ten
's IP address must be entered in the Web
Ten
Preferences "Ethernet (ie0)" field. In either case, Web
Ten
requires an IP address to function.
If using you are using OpenTransport, Web
Ten
's IP address is obtained from the TCP/IP control panel. If you chose to replace OpenTransport, Web
Ten
's IP address must be entered in the Web
Ten
Preferences "Ethernet (ie0)" field. In either case, Web
Ten
requires an IP address to function.
 If you change the "
Replace OpenTransport
" option in the Web
Ten
Preferences field, you MUST quit all applications and restart the system. This allows any other networking applications to recognize the current networking libraries.
If you change the "
Replace OpenTransport
" option in the Web
Ten
Preferences field, you MUST quit all applications and restart the system. This allows any other networking applications to recognize the current networking libraries.
Running Web Ten with an Unconfigured DNS Server or without DNS
If you have disabled BIND under Web Ten and have access to a remote DNS server that is unaware of the Web Ten system's host name, and without any previously configured virtual host names; or if you choose to run without a DNS server, the following information must be entered in the Preferences window:
Connect to the Web Ten Server
If you are connecting to the Web Ten server locally (i.e., using a Web browser on the same machine as your Web Ten system), use the IP address for "localhost" ( 127.0.0.1 ), or the host name or explicit IP address assigned in the Preferences window.
If you are connecting via a browser on a remote system, use the explicit IP address of the Web Ten system.
Adding Virtual Hosts
If you are running Web Ten with no DNS server, you will only be able to use IP-based virtual hosts. Name-based virtual hosts require DNS configuration for each additional Virtual Host. You must check the box "Replace OpenTransport" in the Preferences window. Use the Web Ten Administration Server and enter the IP addresses for the additional virtual hosts in the Virtual Hosts Table.
Running Web Ten with DNS
If you enabled BIND under Web Ten or if you have access to a fully configured DNS server that contains the information about your Web Ten system, as well as the virtual host names you wish to create, the following information must be entered in the Preferences window:
Connect to the Web Ten Server
If you are connecting to the Web Ten server locally (i.e., using a Web browser on the same machine as your Web Ten system), use the IP address for "localhost" ( 127.0.0.1 ), or the host name or explicit IP address assigned in the Preferences window.
If you are connecting via a browser on a remote system, and the remote system has access to the DNS server, use the host name of the Web Ten system. If the remote system does not have access to DNS, use the explicit IP address of the system on which Web Ten is running.
Adding Virtual Hosts
If you are running Web Ten with access to a DNS server, you will be able to use both IP-based virtual hosts and name-based virtual hosts. If you are using IP-based virtual hosting, you must check the box "Replace OpenTransport" in the Preferences window. Name-based virtual hosts can be used with or without OpenTransport. If you enabled BIND under Web Ten , use the Web Ten DNS Administration Server (see section See WebTen Domain Name Server Administration) to configure virtual host names and IP addresses into your local DNS. Then use the Web Ten Administration Server and enter the IP addresses or the DNS configured virtual host names for each additional virtual host in the Virtual Hosts Table.
Web Ten Domain Name Server Administration
Web Ten contains an integrated, browser-based interface for configuring your DNS zones. Changes to the DNS databases are automatically merged into the running DNS. For a description of definitions related to DNS, refer to "See WAppendix B".
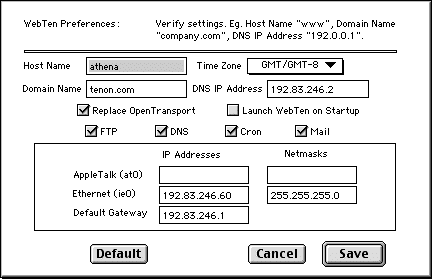
The DNS Settings table is a list of Primary and Secondary Zones that are currently being managed by this system. On initial launch, Web Ten will create a Primary Zone for the domain entered in the Preferences. The zone will include the Host Name and IP Address from the Preferences (see figure in section See WebTen Preferences and DNS), a "localhost" name for loopback connections, and a "www" hostname alias.
The DNS Settings page also presents buttons for creating new Primary Zones, creating new Secondary Zones, and deleting Zones (either Primary or Secondary).

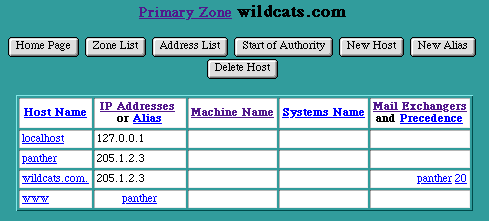
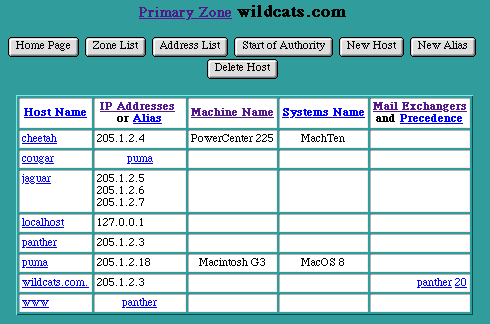
DNS Primary Zone
The "Primary Zone" Page is accessed by selecting an underlined Primary Zone name from the DNS Settings page.
The Primary Zone page displays a table of Host Names and Aliases (sorted alphabetically) that are currently in this Zone. Each row of the table shows the Host Name, its IP Addresses or Alias, its Machine Name and System Name, and its Mail Exchangers (sorted by precedence). To change the information about an entry in the table, select any of the underlined fields to access the specific page for this entry.
This page also presents a row of buttons for managing host names within a Zone:
- "Home Page" returns to the main Web Ten Administration Server Settings page
- "Zone List" returns to the DNS Settings page and its table of Zones
- "Address List" displays a table of Zone info sorted by IP Address
- "Start of Authority" displays the Start of Authority values for this Zone
- "New Host" adds a new Host Name to this Zone
- "New Alias" adds a new Alias to this Zone
- "Delete Host" deletes a Host Name or Alias from this Zone
Adding DNS Hosts
The "New Host" Page is accessed by selecting the "New Host" button in the Primary Zone Page. This page is used to enter the Host Name of a new Host to be included in this Zone, its IP Addresses, and the optional Machine Name and Systems Name information.
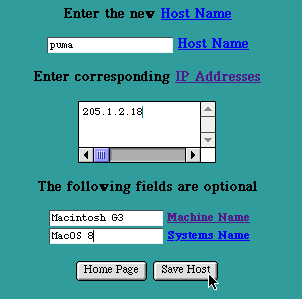
New Host Page
Enter the new Host Name. The new Host Name must be unique within this Zone (i.e., it must be different than any other Host Name or Alias in this Zone). It is not necessary to append the Domain Name at the end of the Host Name (i.e., it is not necessary to enter fully qualified Host Names). If the Domain Name is appended, either with or without a trailing dot ("."), the Domain Name will be stripped off and the abbreviated form will be used in the database and in the presented tables.
One exception to the abbreviation rule is the Host Name that exactly matches the Domain Name (either with or without the trailing dot). In this case the Host Name is not truncated (a dot is added if it was omitted). This Host Name is often used to specify the default Mail Exchanger for an entire Domain or to specify a default IP Address for attempts to access this Domain without explicitly specifying a Host Name.
Enter an IP Addresses in the Internet dot (".") notation (e.g., " 205.1.2.3 ") for this Host Name.
Enter the Machine Name and Systems Name. These fields are optional and may be left blank. Typically the Machine Name is used to record the Host's brand of hardware, and the System Name is used to record the name and version of the Operating System in use on this Host. However, these fields may be used to hold any kind of information about the Host. They may contain a space (" "), but must not contain a double quote (" " ").
Select the "Save Host" button to submit the new Host Name information. The new information will be updated in the Primary Zone's records and will be presented in the Host Table for this Zone.
Adding Host Aliases
The "New Alias" Page is accessed by selecting the "New Alias" button in the Primary Zone Page. This page is used to enter the Host Name of an Alias or nickname to be included in this Zone, and the name of the Host corresponding to this nickname.
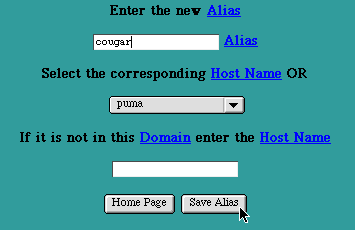
Adding an Alias
Enter the new Alias Name. The new Alias Name must be unique within this Zone (i.e., it must be different than any other Host Name or Alias in this Zone). It is not necessary to append the Domain Name at the end of the Alias Name (i.e., it is not necessary to enter fully qualified Host Names). If the Domain Name is appended, either with or without a trailing dot ("."), the Domain Name will be stripped off and the abbreviated form will be used in the database and in the presented tables.
Select a Host Name from the pop-up list. Typically Aliases correspond to Hosts in the same Zone as the Alias. If this is the case, select the Host Name from the pop-up list of Names currently in this Zone. Otherwise enter the Host Name in the optional Host Name field. If this field is not empty, the entered Host Name will be used rather than the selection from the pop-up list.
If the entered Host Name is not in this Zone, it is necessary to enter a fully qualified Host Name including the dots (".") and a trailing dot.
Select the "Save Alias" button to submit the new Alias Name information. The new information will be updated in the Primary Zone's records and will be presented in the Host Table for this Zone.
Deleting a Host
The "Delete Host" Page is accessed by selecting on the "Delete Host" button in the Primary Zone Page. This page is used to select the Name of a Host or Alias to be deleted from this Zone.
Select the Name of the Host or Alias to be deleted from the pop-up list.
Select the "Delete Host" button to delete this Host or Alias. The Deleted name will no longer appear in the Host Table for this Zone.
The "Delete Host" Page is accessed by selecting the Delete Host button in the Primary Zone Page. This page is used to select the Name of a Host or Alias to be deleted from this Zone.
Select the Name of the Host or Alias to be deleted from the pop-up list.
Select the "Delete Host" button to delete this Host or Alias. The Deleted name will no longer appear in the Host Table for this Zone.
Changing a Host Name Record
The "Host Name" Page is accessed by selecting an underlined Host Name. This page presents a list of IP Addresses for this host and the optional Machine Name and Systems Name information.
Change the information for this Host by modifing any of the information presented in this page and selecting the "Save Host" button. The new information will be updated in the table of Host Names presented in the Primary Zone Page.
The "Host Name" Page also presents a "Mail Exchangers" button. Select this button to access a page of Mail Exchanger information or to add or delete Mail Exchangers for this host.
Changing a Host Alias Record
The "Alias" Page is accessed by selecting an underlined Alias. This page presents a pop-up list of Host Names and Aliases in this Zone with the currently valid Host Name for this Alias selected as the default.
Change the information for this Alias by selecting a Host Name from the pop-up list, following the rules for entering new Host Aliases.
Select the "Save Alias" button to submit the revised Alias Name information. The new information will be updated in the Primary Zone's records and will be presented in the Host Table for this Zone.
DNS Mail Exchangers
The "Mail Exchangers" Page is accessed by selecting an underlined Mail Exchanger in the Host Table or by selecting the "Mail Exchangers" button in the Host Page. The Mail Exchanger page presents a list of Mail Exchangers and their Precedence (sorted by precedence) for a specific Host. Mail Exchangers are also Hosts -- selecting underlined Mail Exchanger names will display the Host Page for that Mail Exchanger.
To change the Precedence of a Mail Exchanger, select its underlined Precedence to access the specific page for that entry.
The "Mail Exchangers" Page also presents the buttons "Add Mail Exchanger" and "Delete Mail Exchanger" to add and delete Mail Exchangers for this Host. Select these buttons to access the corresponding pages.
Adding a Mail Exchanger
The "Add Mail Exchangers" Page is accessed by selecting the "Add Mail Exchangers" button in the Mail Exchanger Page. This page is used to enter the Host Name and Precedence of a new Mail Exchanger for a given Host. The Mail Exchanger may be another Host in this Zone, or it may be a Host in another Zone.
Enter the Host Name of the new Mail Exchanger. If the new Mail Exchanger is not in this Zone, enter a fully qualified Host Name including the dots (".") and a trailing dot. Select a Precedence for this Mail Exchanger from the pop-up list.
Select the "Save Mail Exchanger" button to submit the New Mail Exchanger information. The new Mail Exchanger Name will now be included in the Host Table, under the Mail Exchangers column for the given Host Name.
Deleting a Mail Exchanger
The "Delete Mail Exchangers" Page is accessed by selecting the "Delete Mail Exchangers" button in the Mail Exchanger Page. This page is used to select the Host Name of a Mail Exchanger to be deleted for a given Host.
Select the Host Name of the Mail Exchanger to be deleted from the pop-up list.
Select the "Delete Mail Exchanger" button to delete this Mail Exchanger. The Deleted Mail Exchanger's name will no longer appear in the Host Table under the Mail Exchanger column for the given Host.
Mail Exchanger Precedence
The "Precedence" Page is accessed by selecting on an underlined Precedence in the Mail Exchangers column of the Host Table. The Precedence page presents a pop-up list of Precedences with the current Precedence for the given Mail Exchanger displayed as the default entry.
Select a Precedence for the Mail Exchanger from the pop-up list.
Select the "Save Mail Exchanger" button to submit the new Precedence for this Mail Exchanger. The new Precedence will now be displayed in the Host Table under the Mail Exchangers column for the given Mail Exchanger and Host Name.
A Configured DNS Primary Zone
Returning to the Primary Zone page will reflect the Host additions to the database for this zone. To change the information about an entry in the table, select any of the underlined fields to access the specific page for the entry.
The DNS Reverse Lookup Zone
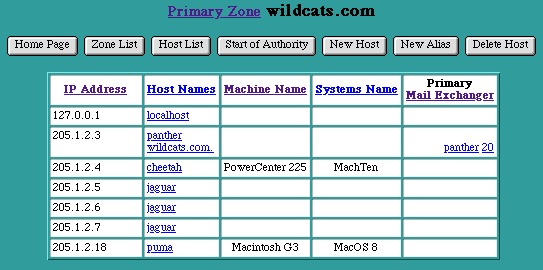
Selecting the "Address List" button from the Primary Zone page displays the Host List sorted numerically by IP address. This is the reverse lookup table, allowing the DNS Server to reference a Host Name when queried with an IP address. Changes to the Reverse Zone are made automatically with modifications to the Primary Zone table. A single Reverse Lookup Zone may serve multiple primary zones sharing the same network number.
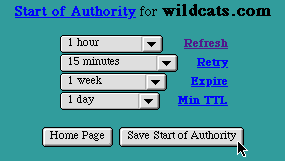
DNS Start of Authority Record
The "Start of Authority" Page is accessed by selecting the "Start of Authority" button in the Primary Zone Page. This page presents pop-up lists of Start of Authority information with the current entries for the given Primary Zone displayed as the defaults.
Select the Start of Authority values from the pop-up lists. The Start of Authority values govern how often other Domain Name Servers check with this Server to ensure that their information is up to date. The Refresh, Retry, and Expire values are only used by other Domain Name Servers if they are acting as Secondary Servers for this Zone. The Min TTL or Minimum Time-To-Live value is used by any other Domain Name Server that queries any piece of data within this Zone. The time-to-live tells the other DNS Servers how long they may cache the data before checking back with this Server to see if the data has changed.
To change any Start of Authority information for a given Primary Zone, select the new Start of Authority values from the pop-up lists.
Select the "Save Start of Authority" button to submit the Start of Authority information. The new information will be updated in the Primary Zone's records and will be presented in the Start of Authority Page the next time it is accessed. Remote DNS servers that are Secondaries to your zones will pick up the changes no later than when the refresh interval specified in the Secondary's copy of the Zone file expires.
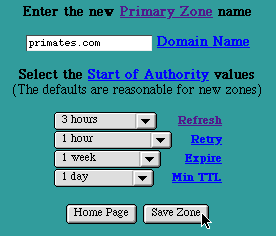
DNS New Primary Zone Page
The "New Primary Zone" Page is accessed by selecting the "New Primary Zone" button from the main DNS Settings page. This page is used to enter the Domain Name of a Primary Zone to be managed by this system. The Domain Name must be unique -- no other Primary or Secondary Zone may have the same Domain Name on this system.
Enter the Domain Name for the Primary Zone. Use the correct spelling, including the dots ("."). The trailing dot is optional. For example, primates.com can be entered as either " primates.com " or " primates.com. ".
Select the Start of Authority values from the pop-up lists. The default Start of Authority values are reasonable for new Primary Zones.
Select the "Save Zone" button to submit the New Primary Zone information. The new Primary Zone Name will now be included (in alphabetical order) in the table of Primary Zones in the DNS Settings Page.
DNS New Secondary Zone Page
The "New Secondary Zone" Page is accessed by selecting the "New Secondary Zone" button from the main DNS Settings page. This page is used to enter the Domain Name of a Secondary Zone to be managed by this system. The Domain Name must match the Domain Name for an existing Zone. (Secondary Zones are always redundant copies of existing Zones, on other systems.)
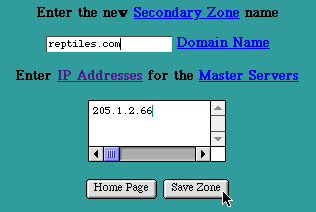
New Secondary Zone
Enter the Domain Name for the Secondary Zone. Use the correct spelling, including the dots ("."). The trailing dot is optional. For example, reptiles.com can be entered as either " reptiles.com " or "r eptiles.com. ".
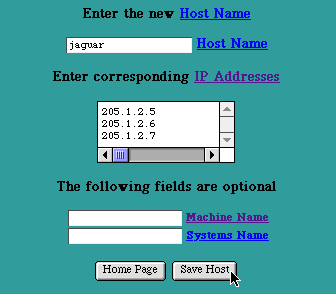
Enter a list of IP Addresses (in the Internet dot "." notation, for example " 205.1.2.66 ") for the Master Servers of the existing Zone. The list may include a single IP Address, or multiple IP Addresses (up to ten). Multiple IP Addresses can increase the availability of a Zone's database. In cases where a Master Server has several IP addresses by which it may be contacted, or when multiple Master Servers exist for a given Zone, multiple IP Addresses should be used. The order in which the IP Addresses are entered is the order the Domain Name Server will use when attempting connections. The Domain Name Server will cycle through the list until it successfully contacts a Master Server.
In the case where a Secondary Zone is being created simply to move a Zone from an existing Server, a single IP Address is sufficient. Enter the IP Address of the Master Server for the existing Domain.
Select the "Save Zone" button to submit the New Secondary Zone information. The new Secondary Zone name will now be included (in alphabetical order) in the table of Zones on the DNS Home Page.
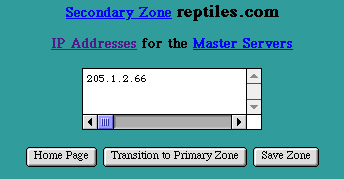
DNS Secondary Zone
The "Secondary Zone" Page is accessed by Selecting an underlined Secondary Zone name from the main DNS Settings page. This page presents a list of IP Addresses for the Master Servers for this Secondary Zone.
To change any of the information for the Master Servers for this Secondary Zone, modify any of the IP Addresses in the list.
Select the "Save Zone" button to submit the Secondary Zone information. The new information will be updated in the Secondary Zone's records and will be presented in the Secondary Zone Page the next time it is accessed.
Creating a Primary Zone from a Secondary Zone
When WebTen is configured as a Secondary DNS for a Zone, a copy of the Zone database is obtained from the Master Server when WebTen DNS is first launched. The backup copy is kept up to date by periodically querying the Master Server according to the settings in the Start of Authority Record in the backup Zone file or, if the Master Server supports the BIND8 protocol, via an automatic notification mechanism whenever the Primary Zone file is modified.
The "Secondary Zone" Page presents a Transition to Primary Zone button. Selecting this button will transition this Secondary Zone into a Primary Zone on this system. When the Secondary Zone is transitioned into a Primary Zone, the backup Zone file is used as the initial database for the Primary Zone. A Primary reverse lookup zone is automatically created for the transitioned zone.
Part or all of an existing DNS database can be moved to the local system by setting up a Secondary Zone for each Zone you wish to move, then transitioning these Secondary Zones into Primary Zones.
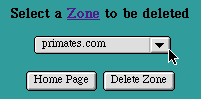
Deleting DNS Zones
The "Delete Zone" Page is accessed by selecting the "Delete Zone" button. This page is used to select the Domain Name of a Primary or Secondary Zone to be deleted from this system.
Select the Domain Name of the Zone to be deleted from the pop-up list.
Select the "Delete Zone" button to delete all information about this Zone. The Deleted Zone name will no longer appear in the table of Zones on the DNS Home Page.
DNS Database Files
The tenon/etc/named folder holds the database files for BIND DNS under WebTen.
Primary Zone files managed by WebTen DNS are designated " db.thedomain ", where " thedomain " is the domain name.
Secondary Zone files obtained from a Primary Master and managed as back up
copies by WebTen DNS are named " db_s.thedomain ".
Reverse Lookup Zone files are designated " db.xx.xx.xx " where " xx.xx.xx " is the network number of the reverse domain. The " db.127.0.0 " file is the reverse lookup file for the loopback "localhost" name.
The name.root file contains the names of root domain servers used to initialize the WebTen DNS cache.
The named.conf is the start up file for BIND containing the list of zones managed by WebTen DNS, their correspoding zone files, and any DNS options.
DNS Manager CGI
If necessary, WebTen's DNS service can be restarted via a browser by using the
dns-mgr CGI in the /cgi-bin folder. This CGI is protected via the WebTenAdmin realm. To cause the DNS server to re-read its configuration file and reload the database or to query Master servers to update all secondary Zone files:
http://yourhost/cgi-bin/dns-mgr?reload
To display a list of options for the dns-mgr CGI, use:
Registering your DNS Zones
If data in a newly created Primary Zone is to be made available to the Internet at large, the newly created Zone must be registered with the Internic at http://rs.internic.net , a central registry for Internet Domain Name Servers. If the newly created Zone is a part of an Intranet that is not connected to the Internet, or there is no requirement to make this Zone's data accessible to the Internet, this registration step may be skipped.