![]()
![]()
![]()
![]()
![]()
Using the Web Interface
![]()
This chapter introduces the Post.Office web browser-based user interface. Among the topics discussed in this chapter are:
Although just about anybody with a web browser and a network connection to your mail server system can access the Post.Office web interface, they’re not going to get very far unless they have the proper access. Access in Post.Office is verified by requiring users to supply their e-mail account address and the password defined for their account. Only if a user can supply an address and password for an existing account will they be able to enter Post.Office.
The first step in the login process is getting the URL (that is, the web address) of the system where Post.Office is running. You should have received an e-mail message when your account was created that contains the appropriate URL. Enter this address in your web browser to access the Post.Office login form. The default address would be: http://
If you didn’t get the confirmation message, or if you deleted it without noting the web address for your Post.Office server, you’ll need to contact your system administrator (the person who installed Post.Office) to get this information.
When you get your web browser pointed to the right URL, you’ll see the Post.Office Authentication Information Form. This is a login screen that requires users to enter their e-mail address and password before letting them poke around the system.
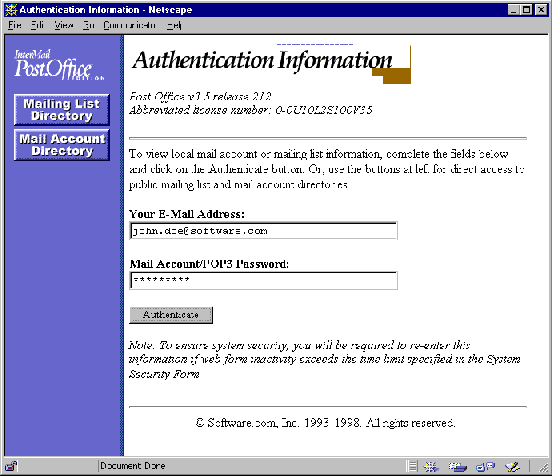
Figure 3-1: Authentication Information Form
You probably noticed the Mailing List Directory and Mail Account Directory buttons at the left of the form. These navigation buttons allow users who don’t have e-mail accounts in Post.Office (and who subsequently cannot log into the system) to access information on the accounts and mailing lists hosted by Post.Office. These options are discussed in Chapters 5 and 7.
To log in to Post.Office, you must enter an e-mail address of an existing Post.Office account – as well as a password that corresponds to this address – in the Authentication Information Form. Once you’ve supplied this information, click the Authenticate button to enter Post.Office. Post.Office will verify that this information is correct before allowing you to access additional mail server menus. If the authentication check fails, you will be requested to re-enter your address and password.
Post.Office is like UNIX in regards to logging in to the system. As an administrator, you can log into these operating systems using your own personal account, which leaves you with restricted access to the system, or using the system administrator account (root in the case of UNIX), which gives you virtually unrestricted access.
Likewise, as the administrator of Post.Office, you can log in either as yourself (that is, your own personal mail account) or as the Postmaster (the administrative account), depending on the level of access you require. To log in as yourself, enter your personal e-mail address in the Your E-mail Address field of the Authentication Information Form. To log in as the Postmaster, enter postmaster@host.domain, or whatever you set in the Post.Office app, in this field.
Since this is the Postmaster’s administrative manual, we’re assuming here that you want to log in as the Postmaster and carry out administrative duties. However, this will not always be the case, since logging in as your personal account is more convenient for modifying the attributes of your own e-mail account, and particularly when working with mailing lists. However, logging in as yourself restricts you to the same operations that any ol’ end user can do. Just remember that when you want to operate on the system level (configuring Post.Office, creating accounts, handling undeliverable mail, etc.) you should log in as the Postmaster, and when you want to carry out operations specific to your own account (change your mail delivery options, subscribe yourself to a mailing list, moderate a mailing list that you own, etc.), log in as yourself.
For each of the two accounts that you can use to log in to Post.Office, there is a password that must be given when logging in with that account. This means that when you log in to your e-mail account, you must supply your account’s password, and when you log in to the Postmaster account, you must supply the Postmaster password. The administrator who installed Post.Office defined your e-mail address and password during installation, and also set the Postmaster password. If you don’t know the appropriate passwords, ask your system administrator.
Before we get any further, you should know a couple of things about the Post.Office user interface. First, you should understand the difference between the two types of pages in the web interface: menus and forms.
Menus display lists of actions which can be performed (such as creating an account) or objects which can be viewed, edited, or acted on in some way (such as mailing lists). You generally can’t "do" anything in a menu, but you can use a menu to get to a form for carrying out whatever task you have in mind. The navigation buttons Account Admin, Mailing Lists, Deferred Mail, System Config, and Help at the left of all menus allow you to easily move between the available top-level menus.
The Account Administration menu, which is the first thing you see after logging in from the Authentication Information Form, is an example of a menu. Like other menus, it shows you a set of links to forms that you can use to carry out specific operations. See Chapter 5 for a description of the options available from this menu.
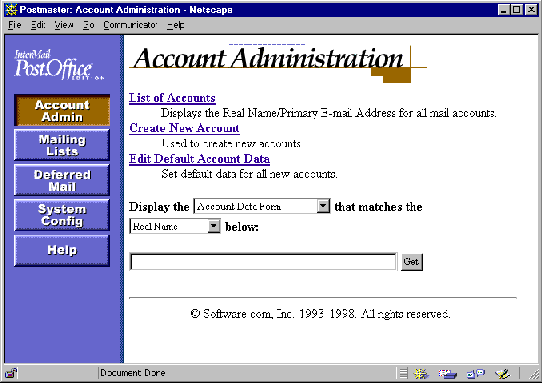
Figure 3-2: Account Administration menu
Like the Account Administration menu above, most menus display some predefined set of options. However, other menus – such as the list of available mailing lists – display lists of objects that may number in the tens of thousands. To avoid making you wait forever to see the entire list of objects, these menus break it up into easily digestible chunks of up to 50 objects. The following illustration of the List of Mailing Lists menu demonstrates this type of menu:
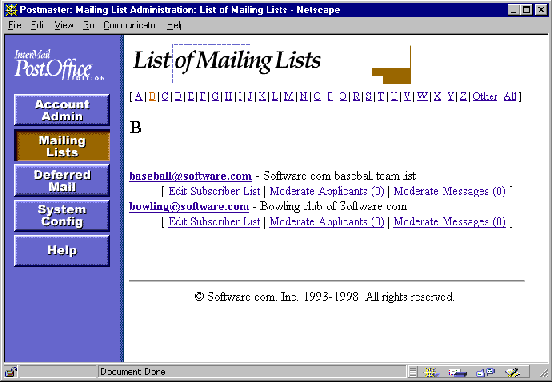
Figure 3-3: List of Mailing Lists menu
Notice that individual A-Z links at the top of the display area allow you to skip to other entries in the alphabetical list (i.e., click on the B link to view a list of mailing lists whose addresses begin with the letter B). Links labeled Previous and Next (not shown in the illustration above) are used to move forward or backward in the alphabetical list in groups of 50. The all link at the top of the menu, which displays the entire list of objects, is the only option that causes more than 50 entries to be shown at a time.
Forms, meanwhile, contain the data related to an object, such as an e-mail account. Most of the data displayed in a form can be modified and saved, and almost all of the actions that you perform in the interface take place in forms. Forms are distinguished by the lack of menu navigation buttons, as well as by the appearance of execution buttons that allow you to save or discard your changes.
Forms are typically invoked from menus. The Default Account Data Form, for example, is invoked when you click the Edit Default Account Data link on the Account Administration menu (Figure 3-2). Like other forms, it allows you to modify specific information and save the changes by submitting the form.
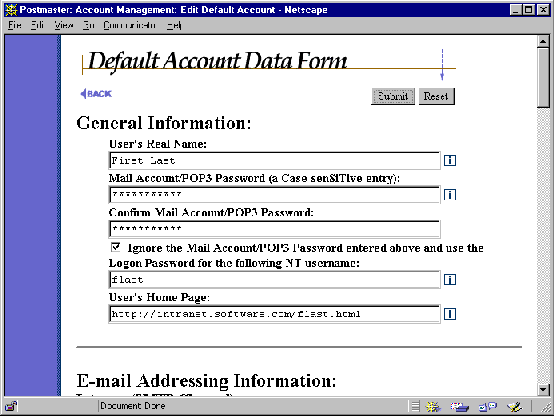
Figure 3-4: Default Account Data Form (only the top portion is shown; the complete form is much larger than what you see here)
Both the Account Administration menu and the Account Data Form are described in greater detail in Chapter 5.
Along with the Account Administration menu mentioned above, there are four other top-level menus available to you: Mailing List Administration, Status of Deferred Mail, System Configuration, and Online Documentation (Help). These menus can be displayed at any time by clicking on the appropriate menu button (Account Admin, Mailing Lists, Deferred Mail, System Config, or Help) at the left side of any menu screen. You can switch from menu to menu at any time by clicking one of these menu buttons.
The Post.Office web interface is like a web site, which means that you’ll be maneuvering through a series of pages that don’t let you see everything at once. Unfortunately, this may get you lost if you don’t remember how you happened to get to a certain form. For just this reason, we’ve given you a
![]() link on every form that lets you move up a step or two in the form/menu hierarchy. The
link on every form that lets you move up a step or two in the form/menu hierarchy. The
![]() link is visible in Figure 3-4 at the top left of the form. Unlike the browser’s built-in "back" button, which may get you to a form with out-of-date information, this option returns you to the appropriate form or menu with all data updated for whatever modifications you’ve been making.
link is visible in Figure 3-4 at the top left of the form. Unlike the browser’s built-in "back" button, which may get you to a form with out-of-date information, this option returns you to the appropriate form or menu with all data updated for whatever modifications you’ve been making.
Along with the
![]() link, most forms also include the execution buttons Submit and Reset. Clicking on the Submit button commits whatever changes you have made to data on the form, and typically closes the form and returns you to the top-level menu (Account Administration, Mailing List Administration, etc.). The Reset button allows you to cancel your changes by resetting all form fields to their previous values, and leaves you in the current form.
link, most forms also include the execution buttons Submit and Reset. Clicking on the Submit button commits whatever changes you have made to data on the form, and typically closes the form and returns you to the top-level menu (Account Administration, Mailing List Administration, etc.). The Reset button allows you to cancel your changes by resetting all form fields to their previous values, and leaves you in the current form.
There are several ways to get information if you need help with something you’re doing in Post.Office. First, there are online versions of all Post.Office manuals (including this one), as well as a list of frequently-asked-questions (FAQ), available to you in the web interface. Second, there is field-specific online help available in most forms. There is also a continously updated faq on the tenon website (www.tenon.com) along with a Post.Office mailing list. Finally, when all else fails, you can contact the Tenon technical support department support@tenon.com.
To view the available online documentation, click on the Help menu button on the left side of any menu (if you’re at a form that doesn’t show the menu buttons, use the
![]() link to move up the interface hierarchy until you see them).
link to move up the interface hierarchy until you see them).
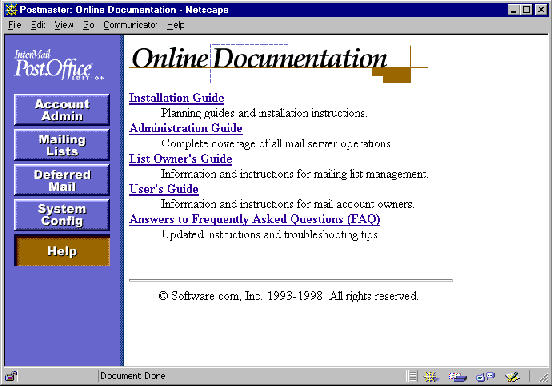
Figure 3-5: Online Documentation menu
The documents available from this menu are the following:
The FAQ link takes you to the Tenon.com web site, where a frequently updated version of the Post.Office FAQ is kept for your convenience. The other links takes you to electronic versions of each manual, which are installed with Post.Office. All of the documents available from this menu contain a table of contents, which you can search if your browser supports word searching. Click on a link in the table of contents to view the corresponding information.
Most forms include links to online help, which can be handy if you don’t understand how to use a certain field. For example, if you are setting mail delivery options and have no idea what the Program Delivery option is all about, you can click on the help link for additional information. The help link is the graphic to the right of form fields that looks like this:
If you’ve looked through the documentation, read the help text, and still can’t find out the information that you’re looking for, you can call(800-662-2410) or e-mail(support@tenon.com) the Tenon technical support department. Those folks are there to help you.
This section describes some common login problems, with some suggestions for dealing with them.
Check to see if the Caps Lock of your keyboard is currently on. The Post.Office password is CaSe-senSiTive, so accidentally setting the Caps Lock can leave a user shut out of the mail system. A simple mistake, but you’d be surprised how often this very miscue generates questions and concerns from users.
As a security measure, Post.Office will sign you out of the web interface if there is no activity for a period of time. You can set the specific number of minutes for this timeout period in the System Security Form (described in Chapter 4). This feature prevents others users from making modifications to the system if you log into the interface and then leave for the day with your web browser still running. If you get bounced back to the Authentication Information Form, simply log in again and continue your activities.
When attempting to access the Post.Office web interface, you may find that entering the URL to the correct server is getting you to web pages other than the Authentication Information Form shown in Figure 3-1. This occurs when the same computer that is being used as a mail server is also being used as a WWW server; instead of connecting to Post.Office, you’re connecting to the web site hosted by this system.
The greeting message that you received when your account was created contains the appropriate URL for logging in to the Post.Office web interface. If you didn’t get a greeting message, or you unwisely deleted it and no longer have a copy, you should contact your system administrator (whoever installed Post.Office) to get the correct URL.
If solving the problem just isn’t enough for you, and you need to know why you’re solving the problem, what follows is a description of the situation.
This gets into the pretty technical areas of client/server computing, but here’s what’s going on: Server machines use "ports" to match server processes (such as a web server) to the client programs (like your browser) that will be interacting with them. Ports are simply numbers used to identify a process and distinguish it from the other thousands of processes that may also be running on the same computer. Whether you realize it or not, every time you ask a program on your client system to interact with a server machine, you are asking to use a specific port; otherwise, the server would have no idea which of its many available services you were trying to use.
Web servers generally use port 80 of the server system, so this is where your web browser is looking unless you say otherwise. So if you ask your web browser to go to the address
http://titan.tenon.com
what you’re really asking is to connect to port 80 of this computer and interact with whatever server process it finds there. Port numbers can be specified in URLs by using the ":#" notation at the end of the address, so the above address is equivalent to:
http://titan.tenon.com:80
So far so good. Post.Office includes its own web server for its web-based interface, and like other web servers, it will run on port 9090 by default. If the server system on which the mail server is installed is already running a web server, the Post.Office web server process must NOT be set to run on port 80 (otherwise, it would prevent all access to the web site). An administrator can change the port setting through the Post.Office app
Again, in cases where the server is hosting both Post.Office and a web site, the Post.Office web server may be running on just about any unused server port, the default of 9090 should be fine, and it is not recommended to change it.
Post.Office ©Software.com, Inc. 1994-1998
![]()
![]()
![]()
![]()
![]()