Web Ten Administration
Web Ten can be configured using any Web browser. The Web browser interface includes easy-to-use tables and forms that eliminate dealing with cryptic Apache directives and the nuisance of updating IP address aliases for each virtual server. Built-in error checking identifies redundant or incomplete entries. Updates are immediately available to the network. And, of course, all documentation is available on-line via the Web.
The browser may be running directly on the Web Ten system, or on a remote host connected via a network to the Web Ten system. Links within the Web Ten Administration Server pages connect you directly to on-line documentation for all aspects of Web Ten administration.
The Administration Server
The Web Ten Administration Server is a stand-alone, special purpose Web server that runs within Web Ten . This server uses a different port number (the default is port 84), and can be started and stopped independently from Web Ten 's main Web server (Apache).
Starting the Administration Server
The Web Ten Administration Server is not automatically started when Web Ten is started. It is typically started on demand and dispensed with once any administration changes are complete. The Administration Server may be started by using Web Ten 's Admin menu and selecting the Start Admin item. Conversely, the Administration Server may be stopped by selecting the Stop Admin item.
The Web Ten Administration Server may also be started remotely. Remote startup of the Administration Server uses the Apache server, so it is necessary that Apache is running. The remote startup capability is implemented as a CGI script. Use the path " /webten_admin " to invoke this CGI script, thus starting up the Administration Server. For example, if your Web Ten system is named " www.yourdomain.com ", the URL to start up the Administration Server is:
http://www.yourdomain.com/webten_admin
The /webten_admin URL does not start multiple instances of the Administration Server if it is already running. It simply returns a redirection URL to connect the browser to the already-running Administration Server. This URL is included in the default Web Ten home page.
If you know that the Administration Server is already running, you may connect directly to it using the host name of your Web Ten system and the port number for the Administration Server. For example, if your Web Ten system is named www.yourdomain.com , the following URL will connect directly to the Administration Server if it is running. It will not start the Administration Server if it is not running.
Web Ten Administration Server
Access to the Web Ten Administration Server is restricted to users in the WebTenAdmin group. There are two ways that users may be added to the WebTenAdmin group. Use the Set Admin Password item under the Admin menu (see section See Set Admin Password), or use the Users and Groups tables accessible from within the Web Ten Administration Server page (see sections See Users and See Groups).
The latter method requires a valid password to access Users and Groups . Once you have a valid password for yourself, use this method to add passwords for other users.
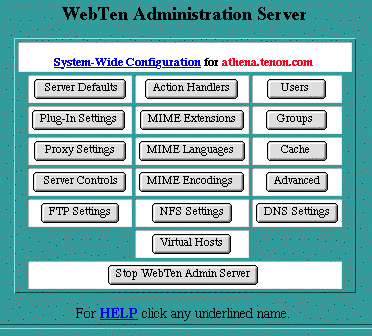
Once connected to the Web Ten Administration Server, the administration pages appear, as illustrated in "See WebTen Administration Server".
Navigating the Administration Pages
The Web Ten administration pages use many of the features of HTML forms and CGI scripting to present the Web server's configuration information in tables that are easy to read and easy to modify.
How the information is displayed depends on the type of permissible entries. Related entries are grouped together. Lists are sorted alphabetically. Default or system-wide entries are displayed in the lower portions of the tables, while user-defined changes are displayed in the top portions of the tables. Buttons are provided to save or reset any changes made to these forms, to return to the Web Ten Administration Server, or to move on to other tables related to the current table. Many items are displayed as links for quick access to a specific section in the documentation. The following sections explain the conventions used for navigating the configuration settings and making changes to those settings.
Making Changes
To make changes to an item, either re-type its text, change the radio button or check box settings, or select a different item from a pull-down list. Then click the Save button. If an entry in a table is not presented in a text edit field, or as a radio button, check box, or pull-down list, that entry may not be changed. Multiple changes per save are permitted. Once changes are saved, the table is re-displayed with the corresponding changes in place.
 Changed items may move to a different row in a table if the rows are sorted and the key used in the sort was one of the changed items.
Adding Entries
New items are usually entered in the first row of a table, which has been left blank by design. When new entries are saved, the table is re-displayed and the new entries appear in their proper place in the table. The first row of the table reverts to blank, awaiting input of another new entry.
Resetting Entries
Each of the Web Ten administration pages provides a Reset button. Clicking on this button will reset all entries in the tables to their current values (i.e., the values they had the last time anything was saved). This button does not make or save any changes in the Web server's configuration; it is essentially an "undo" operation for typos or other incorrect modifications noticed before any such changes are saved.
Inheritance
If certain settings for a particular item are not explicitly set, they are inherited from the parent folder (if the corresponding settings exist). This notion of inheritance is reflected in a table by including the word Inherited , in a red font, in the corresponding entry. Modifying an inherited setting and clicking the Save button will save an explicit setting for this entry; thus, the Inherited flag will not be displayed. Subsequently deleting the explicit entry will cause the setting to be re-inherited from the parent, and the Inherited flag will again appear (providing, of course, that the corresponding setting for the parent still exists).