Web Ten Menus
Web Ten menus are used to set the system configuration and to display system status. The Preferences item of the File menu and the Set Admin Password item of the Admin menu are used early in the configuration of a Web Ten installation to set network and user information. Other menu items control Web Ten operation and display Web Ten status.
File Menu
The File menu contains Close , Preferences and Quit menu items.

The Close menu item will close the currently selected window. It has a keyboard equivalent of <Command-w> that will accomplish the same function.
The Preferences menu item supports the baseline configuration of the Web Ten system and network configurations. See section See Preferences for more information.
The Quit menu item terminates Web Ten operations. It has a keyboard equivalent of <Command-q>. The termination process may take several seconds. During this time, internal file systems are synchronized and each Apple plug-in module is informed that a termination is taking place, giving each module an opportunity to shut down.
Preferences
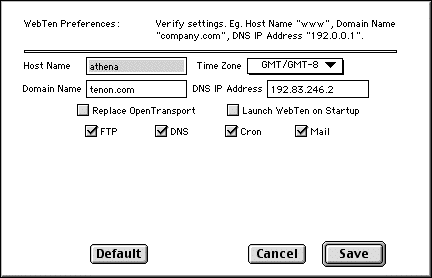
Certain minimum requirements must be satisfied before Web Ten can be launched. The Pref erences menu item lets you configure these requirements. By default, Web Ten copies the Host Name and Time Zone settings from the Sharing Setup and Date & Time control panels, respectively. If OpenTransport has been installed, Web Ten gets its default networking settings from the TCP/IP control panel. If the previously set values from these control panels satisfy the minimum requirements, Web Ten proceeds with full operations. Otherwise, Web Ten displays the Preferences window with as many of the default fields filled in as possible. Web Ten is not launched until the minimum required information has been entered.
Host and Domain Name
The Host Name is the name assigned to your Macintosh Web server machine. It is the name by which other machines on the network will refer to this host. This information is automatically obtained from the Macintosh Name in the Sharing Setup control panel. Web Ten needs a host name to operate properly. If your machine does not have a host name, you still need to enter something in this field.
The Domain Name is the name assigned to your network. If available, this information is obtained from the TCP/IP control panel. It is the name by which other machines on external networks will refer to your network and it is the default network name used by machines on your network. If you are using Web Ten exclusively within an intranet with its own domain name, or you already have a valid internet domain name, enter the domain name.
In See Preferences Window for example, the host name is bee and the domain name is tenon.com. This Web Ten would then be accessed with the URL http://bee.tenon.com. The URL http://www.tenon.com will request the host `www' in the domain `tenon.com.'
Web Ten includes a domain name server. If you wish to operate Web Ten without the support of a domain name server, please see section See Domain Name System (DNS) for information about Web Ten 's built-in DNS server or other DNS alternatives. Web Ten automatically adds DNS records for the host and domain given to its own DNS server.
Time Zone
The Time Zone is the corresponding time zone in which your Macintosh is located. Select the appropriate value from the list. If your time zone does not appear in the list, use the GMT setting with the proper plus or minus value. This information is obtained automatically from the Date & Time control panel.
DNS IP Address
The DNS IP Address is the IP address, in dot notation, of the Domain Name Server on your network. If available, this information is obtained from the TCP/IP control panel. If some machine other than the Web Ten machine is to provide the Domain Name Service on you network, enter the IP address of that machine. If you do not have a Domain Name Server, leave this field blank. See section See Domain Name System (DNS) for more details on configuring Web Ten without a Domain Name Server. To use Web Ten as it's own DNS, put the IP address of the Web Ten machine in this field.
Launching Web Ten On Startup
Web Ten can be configured to start up whenever your Macintosh is restarted. This is accomplished by placing a Finder alias of the Web Ten application in the Startup Items folder in the active System Folder . This check box automatically adds or removes such an alias from the Startup Items folder. See See Preferences Window.
Replacing OpenTransport
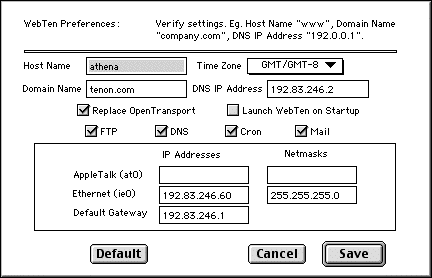
Some Web Ten configurations need the support of multiple IP addresses on a single Macintosh. The Web Ten TCP/IP is the only Macintosh TCP/IP that supports these capabilities. In addition, because Web Ten 's TCP stack is so finely-tuned for top performance, even when OpenTransport supports multihoming, Tenon's stack may be the protocol stack of choice.
At the same time, a number of Macintosh networking applications must have the support of OpenTransport. For example, Timbuktu from Farallon is used to support remote control of a Macintosh. Timbuktu requires OpenTransport. One solution to this problem is to run both the OpenTransport and Web Ten TCP/IP protocol implementations at the same time.
The basic strategy is to configure OpenTransport with one IP address and Web Ten TCP/IP with a second IP address. This allows Macintosh applications to use OpenTransport, and lets Web Ten use its own stack for multi-homing, performance or other reasons.
Replacing OpenTransport
A number of new fields appear when Replace OpenTransport is checked in the dialog box. The new fields will contain default configuration values taken from the current OpenTransport network configuration. Changing the IP address listed in the Ethernet field to an alternate IP address causes Web Ten to respond to that address. As long as that address is different than any other in the network and, importantly, different than the one that is given to the local OpenTransport, both TCP/IP implementations will operate successfully at the time on the same Macintosh.
A final step is to manually move the MacTCPdLib and OTSocketLib files from your WebTen/WebTen Libraries folder to the Disabled folder and move the SocketLib file to the WebTen/WebTen Libraries folder. This will ensure that both classic MacTCP applications and OpenTransport applications that are MacTCP-aware will use the OpenTransport TCP/IP stack.
That's all that is required to run OpenTransport and Web Ten TCP/IP on the same machine at the same time. Simply configure OpenTransport with one IP address, and configure Web Ten TCP/IP with a another IP address. You should also enter this new IP address and a corresponding name into your DNS server. If you subsequently use the Web Ten Admin Server to add virtual hosts, they should be entered into your DNS database.
More RAM will be used when running both TCP/IP implementations. You should be prepared to dedicate as much as 850K of extra RAM to simultaneous TCP/IP operations. This RAM will not be available to your applications.
Networking with OpenTransport
If OpenTransport is installed, the Web Ten Preferences default is to use OpenTransport (by not selecting Replace OpenTransport ). In this mode, the minimum set of preferences that must be set includes the Host Name and Domain Name .
Enabling Web Ten Services
Web Ten can be configured to provide FTP, DNS and clock (Cron) service in addition to Web (HTTP) service when launched. By default, these services are disabled. When one of these items is checked, it is started when Web Ten is started.
For more information on FTP, see chapter See FTP Service.
For more information on DNS, see chapter See Domain Name System (DNS).
For more information on Cron, see chapter See Clock Service (Cron).
For more information on Mail, see chapter See WEBmail.
Testing Web Ten in Loopback Mode
Webmasters often want to test, evaluate and experiment with WebTen before deploying it as a live Web server. WebTen's evaluators often choose to perform their tests entirely in a loopback environment (with both the Web server and the Web browser running on the same machine). WebTen's installation is designed to provide the easiest process and fewest steps to set up a real, live Web server. Thus, configuring WebTen for the degenerate, loopback-only case may require additional steps.
Loopback-only mode may be required to support various situations. The Macintosh used to evaluate WebTen may not have a networking interface. The networking interface may be a dial-up PPP connection with a dynamic IP address assignment. The networking interfaces may exist but they may not be properly configured. Whatever the reason, the steps for configuring your system for loopback-only mode are given below.
The simplest environment for testing WebTen is one with a permanently assigned IP address on a properly configured network. In this situation, WebTen will install easily and it can be tested either via a browser running on the same Macintosh as WebTen or via a browser running elsewhere. If this is your current situation and you wish to test WebTen in a loopback-only mode because of some security concerns about running a Web server, don't worry about it. The default WebTen installation contains no sensitive information that would empower anyone else to compromise your system, nor will it serve anything that you don't explicitly put into the WebTen folders for Web service.
Here is how to set up your system for loopback-only testing:
- Open the AppleTalk control panel, and make sure that it is set to "Connect via Printer Port". Verify that AppleTalk is set to "Active" in the Chooser.
- Set the TCP/IP Control Panel "Connect via" menu to "AppleTalk (MacIP)".
- Set the TCP/IP Control Panel "Configure" menu to "Using MacIP Manually".
- Set the TCP/IP Control Panel "IP Address" to "10.0.0.1".
- Set the TCP/IP Control Panel "Router address" to "10.0.0.1".
- Set the TCP/IP Control Panel "Name Server addr" to "10.0.0.1".
- Set the TCP/IP Control Panel "Search Domains" to "bogus.com".
- Delete any previously installed versions of WebTen. If WebTen was previously installed (and failed from some reason likely due to the current networking configuration or lack thereof), delete the WebTen folder, the WebTen Libraries in the Extensions folder and the WebTen Preferences in the Preferences folder.
- Look in the Extensions folder for the WebTen Libraries. In that folder, you should find a file called SocketLib, and in the folderDisabled under the same folder, you should find a file called OTSocketLib. Switch these, so that SocketLib is under the Disabled folder, and OTSocketLib is in the WebTen Libraries folder. If, for some reason, they are already set up this way, leave them.
- Install WebTen.
- Launch WebTen. In the WebTen Preferences window, check "Replace Open Transport" temporarily to allow you to edit the fields in the box below. Set them up like this:
AppleTalk (at0) 10.0.0.1 255.255.255.255
- Then, uncheck the "Replace Open Transport" box, and then click on "Save". If you are prompted to confirm the changes, click "Save" again. Quit and Re-Launch WebTen.
- Launch a Web browser.
- Connect to WebTen from the browser using either the loopback IP address "127.0.0.1", or the IP address "10.0.0.1".
Edit Menu
The Edit menu contains Undo , Cut , Copy , Paste and Select All menu items. These are traditional Macintosh operations to "cut-and-paste" data between the Macintosh clipboard and Web Ten windows.
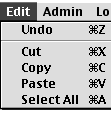
The Undo operation reverses the previous Edit menu operation.
The Cut operation removes the selected text from the Web Ten window and copies it onto the Macintosh clipboard. The Cut operation has the keyboard equivalent <Command-x>.
The Copy peration copies the selected text from the Web Ten window onto the Macintosh clipboard. The Copy operation has the keyboard equivalent <Command-c>.
The Paste operation copies the contents of the Macintosh clipboard into a Web Ten window. The text is copied into the window in which the Web Ten cursor is located. The Paste operation has the keyboard equivalent <Command-v>.
The Select All operation selects all the text associated with the current Web Ten window. The Select All operation has the keyboard equivalent <Command-a>.
Admin Menu
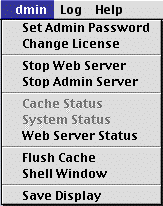
The Admin menu contains Set Admin Password , Cache Status , Web Server Status , System Status , Flush Cache , Shell Window and Save Display menu items.
Set Admin Password
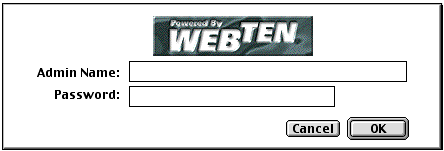
The Set Admin Password menu item should be one of the first operations executed after the installation of Web Ten .
Set Admin Password Window
Use this menu item to set the administrator's user name and password. Both the user name and password are required when using the network-based Web Ten Administration Server. Do not use spaces in the user name. After the Admin Name and Password fields have been filled in, click the OK button to record the user and password, or click Cancel to cancel the request. The password will not be echoed to the screen; rather, bullets will be used to represent the characters, preventing your password from being overseen as it is entered. The password is entered only once, so type carefully. If you mistype and accidently click OK , simply choose this menu item again and retype the user name and password.
Change License
This menu item is used to modify the Web Ten license information while Web Ten is running.
Start/Stop Web Server
The Start/Stop Web Server menu item controls the execution of the Apache Web server thread. This menu item is labeled either Stop Web Server or Start Web Server . When the menu item is labeled Stop Web Server , the Apache Web server thread is operating. Selecting Stop Web Server terminates the operation of the Apache Web server. This menu item may be used to stop Web operations while system-wide configuration or maintenance is undertaken. When the Web server is stopped, this menu item changes to Start Web Server . Selecting Start Web Server starts or restarts Web server operations. The Web server operations can be monitored with the System Status and Web Server Status menu items.
Start/Stop Admin Server
The Administration Server is used to support Web Ten configuration and administration from a Web browser. This menu item is labeled either Stop Admin Server or Start Admin Server . When the menu item is labeled Stop Admin Server , the Administration Server is operating and Web browser-based administration is enabled. Selecting this menu item terminates Administration Server operations. If the Administration Server thread is not operating, Web browser-based administration is inhibited. When the Administration Server thread is not operating, this menu item is changed to Start Admin Server . Selecting the menu item when it is labeled Start Admin Server starts the Administration Server and enables Web browser-based administration.
Cache Status
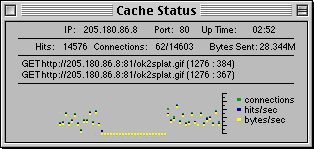
The Cache Status menu item is used to display a Cache Status window. The Cache Status window contains dynamic information about the operation of the cache portion of Web Ten . If the Web Ten cache component is not configured, this window will briefly display an error message and then disappear. The Cache Status window may be dismissed by clicking in the close box in the upper left-hand corner of the Cache Status window, or by using the Close Window menu item in the File menu. The Cache Status window is divided into four sections. Each section is distinguished from the other sections by a horizontal bar.
Cache Status Window
The first section of the Cache Status window contains IP , Port and Up Time data fields. The IP field contains the Internet Protocol address to which the Web Ten cache (often referred to as the Cache Manager) is configured to respond. The Port field contains the TCP/IP port on which the Cache Manager is listening for HTTP network requests. The Up Time field contains the hours, minutes and seconds that the Cache Manager has been running.
The second section of the Cache Status window contains Hits , Connections and Bytes Sent data fields. The Hits field contains the number of HTTP requests that have taken place since the Cache Manager was started. The Connections field has two components. The first component is the number of currently active TCP/IP connections being serviced by the Cache Manager. The second component is the total number of TCP/IP connections that have been serviced since the Cache Manager was started. The Connections field components are separated by a slash ("/") character. The Bytes Sent field contains the aggregate number of Mbytes that have been sent by the Cache Manager in response to previous HTTP requests.
The third section of the
Cache Status
window contains a variable number of lines. Each line contains information about a recent request serviced by the Cache Manager. The first element in the service information line is the type of HTTP request currently being processed. "GET" requests are being processed in
See Cache Status Window. The information that follows concerns the virtual host, port and URL that have been requested. At the end of the line, in parentheses, is the number of bytes sent in response to the request, and the number of milliseconds used to process the request, divided by a colon (":").

This section displays the first two of the requests that are in progress. More requests may be in progress at any point in time. This section gives an indication of part of the load that has been placed on the Cache Manager. Most of the time two requests will be displayed. Occasionally, if the server is more lightly loaded, this will be reduced to one or no display requests. When the number of requests is reduced to zero, the section is not included in the Cache Status display list and is automatically removed from the display.
The last section of the Cache Status window contains a graphical representation of some of the data that is contained in the display. This section is updated at one-second intervals. Three different data variables are displayed each second as a colored dot. The green dots refer to the number of connections currently in progress during that second. The blue dots refer to the number of hits that have taken place during that second. The yellow dots refer to the number of bytes transmitted to all clients during an interval.
It is important to understand that this graphical representation is not meant as a detailed plot of the data, but rather as a relative indicator of activity. Each of the plots is "auto-scaled" relative to other values within its group of data. Therefore, comparisons between different data graphs are invalid unless they are on the same "scale". The auto-scaling process takes place each time a new data point is added to the graph. The auto-scaling values are reset to a "0 to 10" scale each time the display is cleared.
System Status
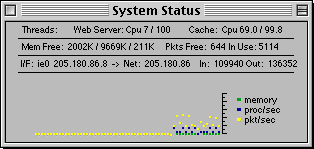
The System Status menu item is used to display a Web Ten System Status window. The System Status window contains dynamic information about the operation of Web Ten . The System Status window may be dismissed by clicking in the close box in the upper left-hand corner of the System Status window, or by using the Close Window menu item in the File menu. The System Status window is divided into four sections.
System Status Window
The first section contains Threads , Web Server: CPU , and Cache: CPU fields. Each field contains accumulated user and system CPU information for the Apache Web server thread and for the cache thread. The Apache thread CPU information is accumulated in system ticks, or 1/60th of a second. The information contains an accumulation of all of the system ticks for the main Apache thread and for its constituent children threads. The Cache: CPU information is presented in tenths of a second. In both fields, the first number represents the number of ticks, or tenths of a second, used by the Apache or cache software itself. The second number represents the amount of time accumulated performing system-related operations, such as network or file operations.
The second section contains Mem Free , Pkts Free and (Pkts) In Use components. The Mem Free component contains three different free memory indications. The first is the amount of free memory in the Web Ten Macintosh application heap. The second is the amount of free memory in the Macintosh Process manager heap. This is sometimes referred to as the amount of free temporary memory. The last value is the amount of free memory in the Macintosh system heap. All of the values are specified in Kbytes.
The Pkts Free value is the number of Web Ten packet buffers that are available for network data. These buffers are essential for carrying network data between the Web Ten cache, the Web server software, and the network interface device within the Macintosh Operating System.
The (Pkts) In Use value indicates the number of packet buffers that are in use. These data structures are used for a number of different functions and do not necessarily indicate only the presence of network data. Typically, a minimum of 30 or 35 packet buffers are in use. This number will increase to thousands of packets as Web Ten is put under load.
The third section contains information specific to each physical network interface attached and configured for use by Web Ten . Since Web Ten supports multiple physical interfaces, there may be multiple lines in this section. This section is active only if Tenon's TCP/IP is configured with Web Ten . This section contains I/F Net , In and Out data values. The I/F value contains the name of the network interface and its associated IP address. The Net data is the network associated with the interface and its IP address. The In value represents the number of packets that have been received by the interface. The Out value represents the number of packets that have been transmitted over the interface. Note that the In and Out counts are per interface counts, not per IP address (many IP addresses may share a single interface).
The last section contains a graphical representation of the memory, CPU and packet data associated with this status window. Like the Cache Status and Web Server Status windows, this data is plotted as a graphical approximation of the information and resources used by this instantiation of Web Ten . Green dots are used to graph the change in memory usage during each one-second interval. Blue dots are used to graph the number of processor ticks that were used during the last second for both the cache and Web server software modules. Yellow dots are used to graph the total number of packets that have been sent and received by the system. The data values are scaled automatically to fit within the graph coordinates.
Web Server Status
The Web Server Status menu item is used to display a Web Server Status window. The Web Server Status window contains dynamic information about the operation of the Apache Web server portion of Web Ten . The Web Server Status window may be dismissed by clicking in the close box in the upper left-hand corner of the Web Server Status window, or by using the Close Window menu item in the File menu. The Web Server Status display is divided into three sections.
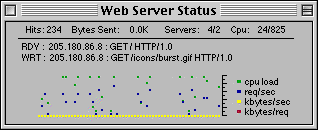
Web Server Status Window
The first section contains Hits , Bytes Sent , Servers and CPU fields. The Hits field contains the number of HTTP requests that have been processed by the Apache Web server. This field is in contrast to the Hits field of the Cache Status display, which contains the total number of requests since the Cache Manager was started. If the Cache Manager is running all the time, the Hits field of the Cache Status Display contains the total number of hits for Web Ten as a whole.
The Bytes Sent field contains the number of Kbytes sent by the Apache Web server since the server was started.
The Servers field contains the number of allocated children threads and the number of active Apache children threads, divided by a slash ("/"). In See Web Server Status Window, there are four currently allocated Apache children and there are two active. The number of allocated Apache children is dynamically set according to the peak load the Apache server has experienced since it was initiated. The number of active servers is a function of the number of HTTP requests that have been passed to the Web server by the Web Ten Cache Manager, or directly by contact to the Apache TCP/IP port.
The CPU field contains the number of CPU ticks (1/60th of a second) that the Apache server and its children threads have accumulated since Web Ten was started. The first number in the field is the number of user level ticks that the Apache server has accumulated. The second number in the field is the number of system level ticks that the Apache server and its constituent threads have accumulated.
The second section of the Web Server Status display contains information about two of the Apache children threads. Each thread processes an HTTP request. The first two threads found in the Apache thread list are displayed in this section. Each thread status is displayed on a single line. The first component of the thread status is the state of the thread. 1 The second component of the thread status is the virtual host referenced by the HTTP request. The third component is the IP address of the initiating host. The fourth component is the type of request. In the example below, a "GET" request was last processed by each thread. The fifth component of the thread status is the HTTP URL itself. The last component is the transfer protocol.

When the Apache server is initialized and no requests have been received, the status lines contain a default indication of " RDY: <- ". Note that this does not mean that requests have not been received and processed by Web Ten , but only that no requests have been received by the Apache component of Web Ten . This indication is replaced with a standard state as subsequent Apache HTTP requests are received.
Finally, there is a graphical representation of Apache activity. Like the Cache Status window, this information is meant as a rudimentary indication of activity and not as a precise graph. This section contains plots for four data streams. Green dots are used to indicate the number of CPU user and server ticks that were accumulated by the Web server during the previous second. Blue dots are used to indicate the number of HTTP requests that were processed during the previous second. Yellow dots are used to indicate the number of Kbytes of data that were transmitted to the Apache clients during the previous second. Red dots are used to indicate the average number of Kbytes per request that were sent during the previous second. Also like the Cache Status window, these graphics are "auto-scaled" for time and space considerations; thus, the same graph's values will be plotted differently depending on the range of values currently displayed for each individual plot.
Flush Cache
This menu item causes the server to delete any data that it has been saved in it's cache. WebSite content is generally what is cached and changes to the content will not be visible to browsers until the cache is emptied. An remotely triggered alternative to this menu item is the flush script. The flush script has the same function as the flush menu item, but is accessed by the URL: http://host.domainname.com/cgi-bin/flush.
Log Menu
The Log menu is used manipulate and display various Web Ten information logs. The menu items include Clear Log Data , Reset Log Config , Display Access Log , Display Error Log , and Display Plug-In Msgs .
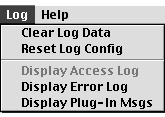
Clear Log Data
The Clear Log Data menu item is used to delete all previously saved log data from disk. This should not be done lightly, as the data files are simply reset to a zero length. The data is not saved or copied.
Reset Log Config
The Reset Log Config menu item resets the log configuration to factory default settings. Occasionally, certain logs are started and, due to a system crash or a disk problem, the settings get out of sync with the data files. This menu item attempts to carefully reset of all log information directives to standard "low profile" settings.
 All open log windows should be closed before the
Reset Log Config
menu item is selected.
Display Access Log
The Display Access Log menu item displays the standard Access Log in Common Log Format. Note that log data is also written to a disk file when this window is open. As the system operates, care must be taken that the disk file does not take all available free disk space. The Clear Log Data and Reset Log Config menu items can be used to clear the disk of Access Log data and reset the output of Access Log entries.
Display Error Log
The Display Error Log menu item displays the Apache Error Log . This log contains an entry for each error that occurred during the servicing of any request. Errors that are reported include, but are not limited to, requests for files that do not exist, CGI errors or failures, and requests that are denied due to invalid authorization.
